Mulai 27 Maret 2025, sebaiknya gunakan android-latest-release, bukan aosp-main, untuk mem-build dan berkontribusi pada AOSP. Untuk mengetahui informasi selengkapnya, lihat Perubahan pada AOSP.
Anda dapat merekam rekaman aktivitas menggunakan Winscope untuk pengembangan dan proses debug lokal.
Winscope menggunakan adb, yang mendukung
koneksi perangkat melalui USB atau Wi-Fi.
Layar Kumpulkan Rekaman Aktivitas ditampilkan saat meluncurkan Winscope.
Koneksi perangkat
Anda dapat menghubungkan perangkat di Winscope menggunakan
Proxy Winscope
atau
Proxy Perangkat Web.
Secara default, halaman beranda Winscope menampilkan UI penyiapan koneksi Winscope Proxy.
Untuk mulai merekam rekaman aktivitas, pilih salah satu mekanisme koneksi
perangkat berikut.
Penyiapan Proxy Winscope
Ikuti langkah-langkah berikut untuk menyiapkan Winscope Proxy:
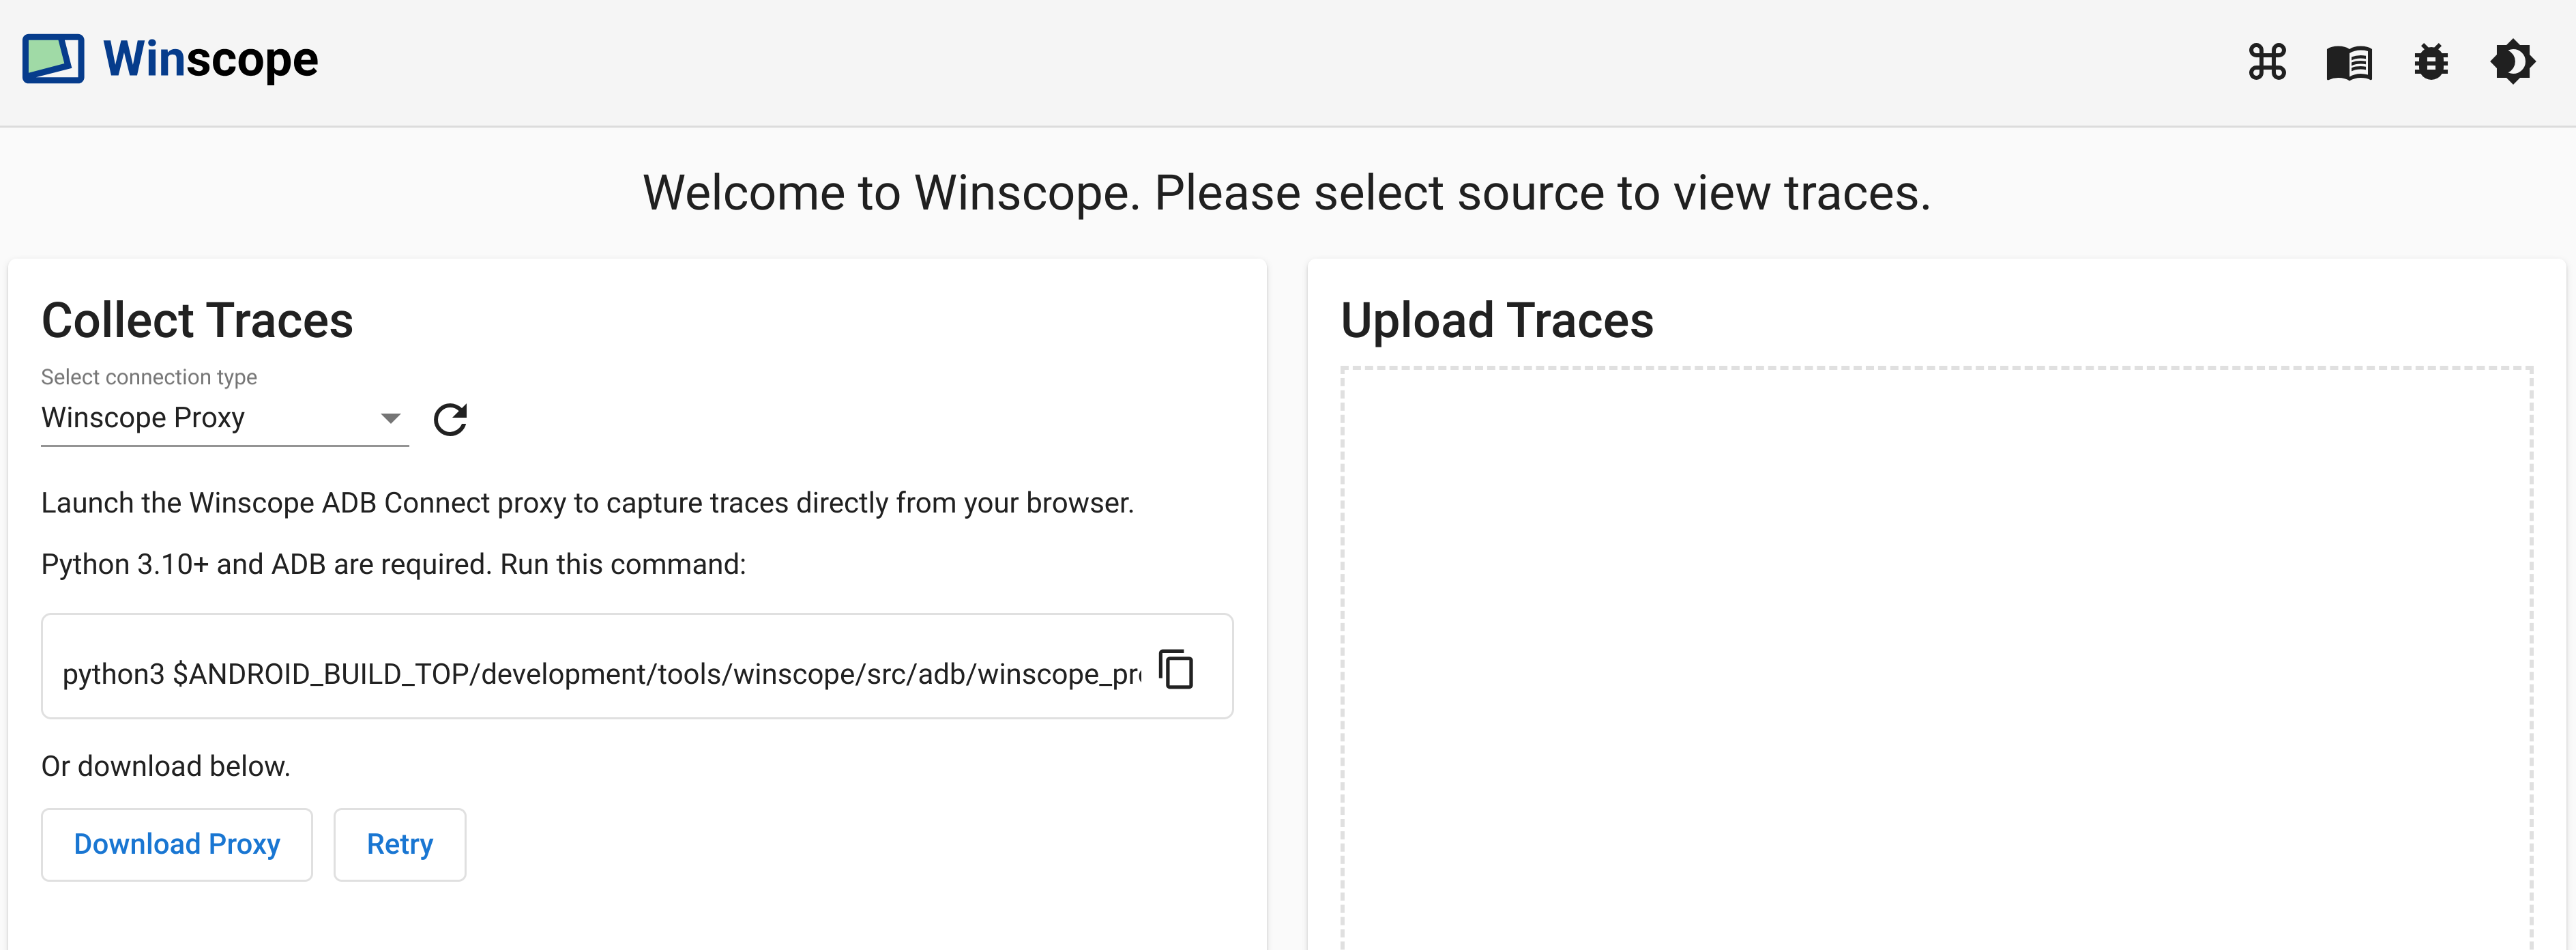
Di bagian Collect Traces di halaman beranda, pilih Winscope Proxy di drop-down Select connection type:
Gambar 1. Ambil rekaman aktivitas menggunakan Winscope Proxy.
Luncurkan proxy Winscope ADB Connect untuk merekam rekaman aktivitas langsung dari browser
Anda, dengan menjalankan perintah berikut:
Perhatikan token proxy Winscope yang ditampilkan di terminal setelah dieksekusi.
Setelah Anda meluncurkan proxy Winscope ADB Connect, layar akan berubah
seperti berikut. Untuk membuat koneksi awal ke proxy, masukkan
token proxy Winscope dari langkah 3, lalu klik Connect.
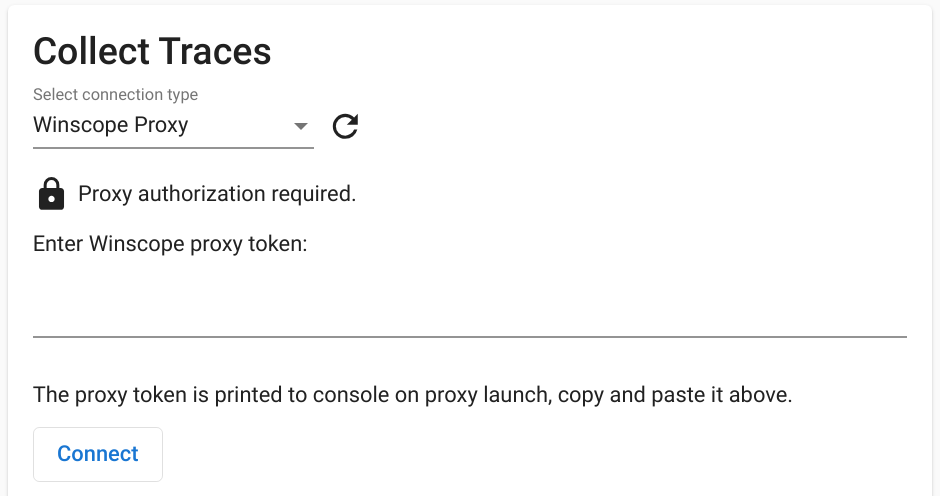
Gambar 2. Hubungkan ke Winscope Proxy.
Penyiapan Web Device Proxy
Ikuti langkah-langkah berikut untuk menyiapkan Web Device Proxy:
Di bagian Collect Traces di halaman beranda, pilih Web Device Proxy di drop-down
Select connection type:
Gambar 3. Rekam rekaman aktivitas menggunakan Web Device Proxy.
Jika Anda tidak memiliki daemon Web Device Proxy di komputer, klik
Instal atau jalankan
penginstal.
Setujui akses origin ke Proxy Perangkat Web melalui dialog.
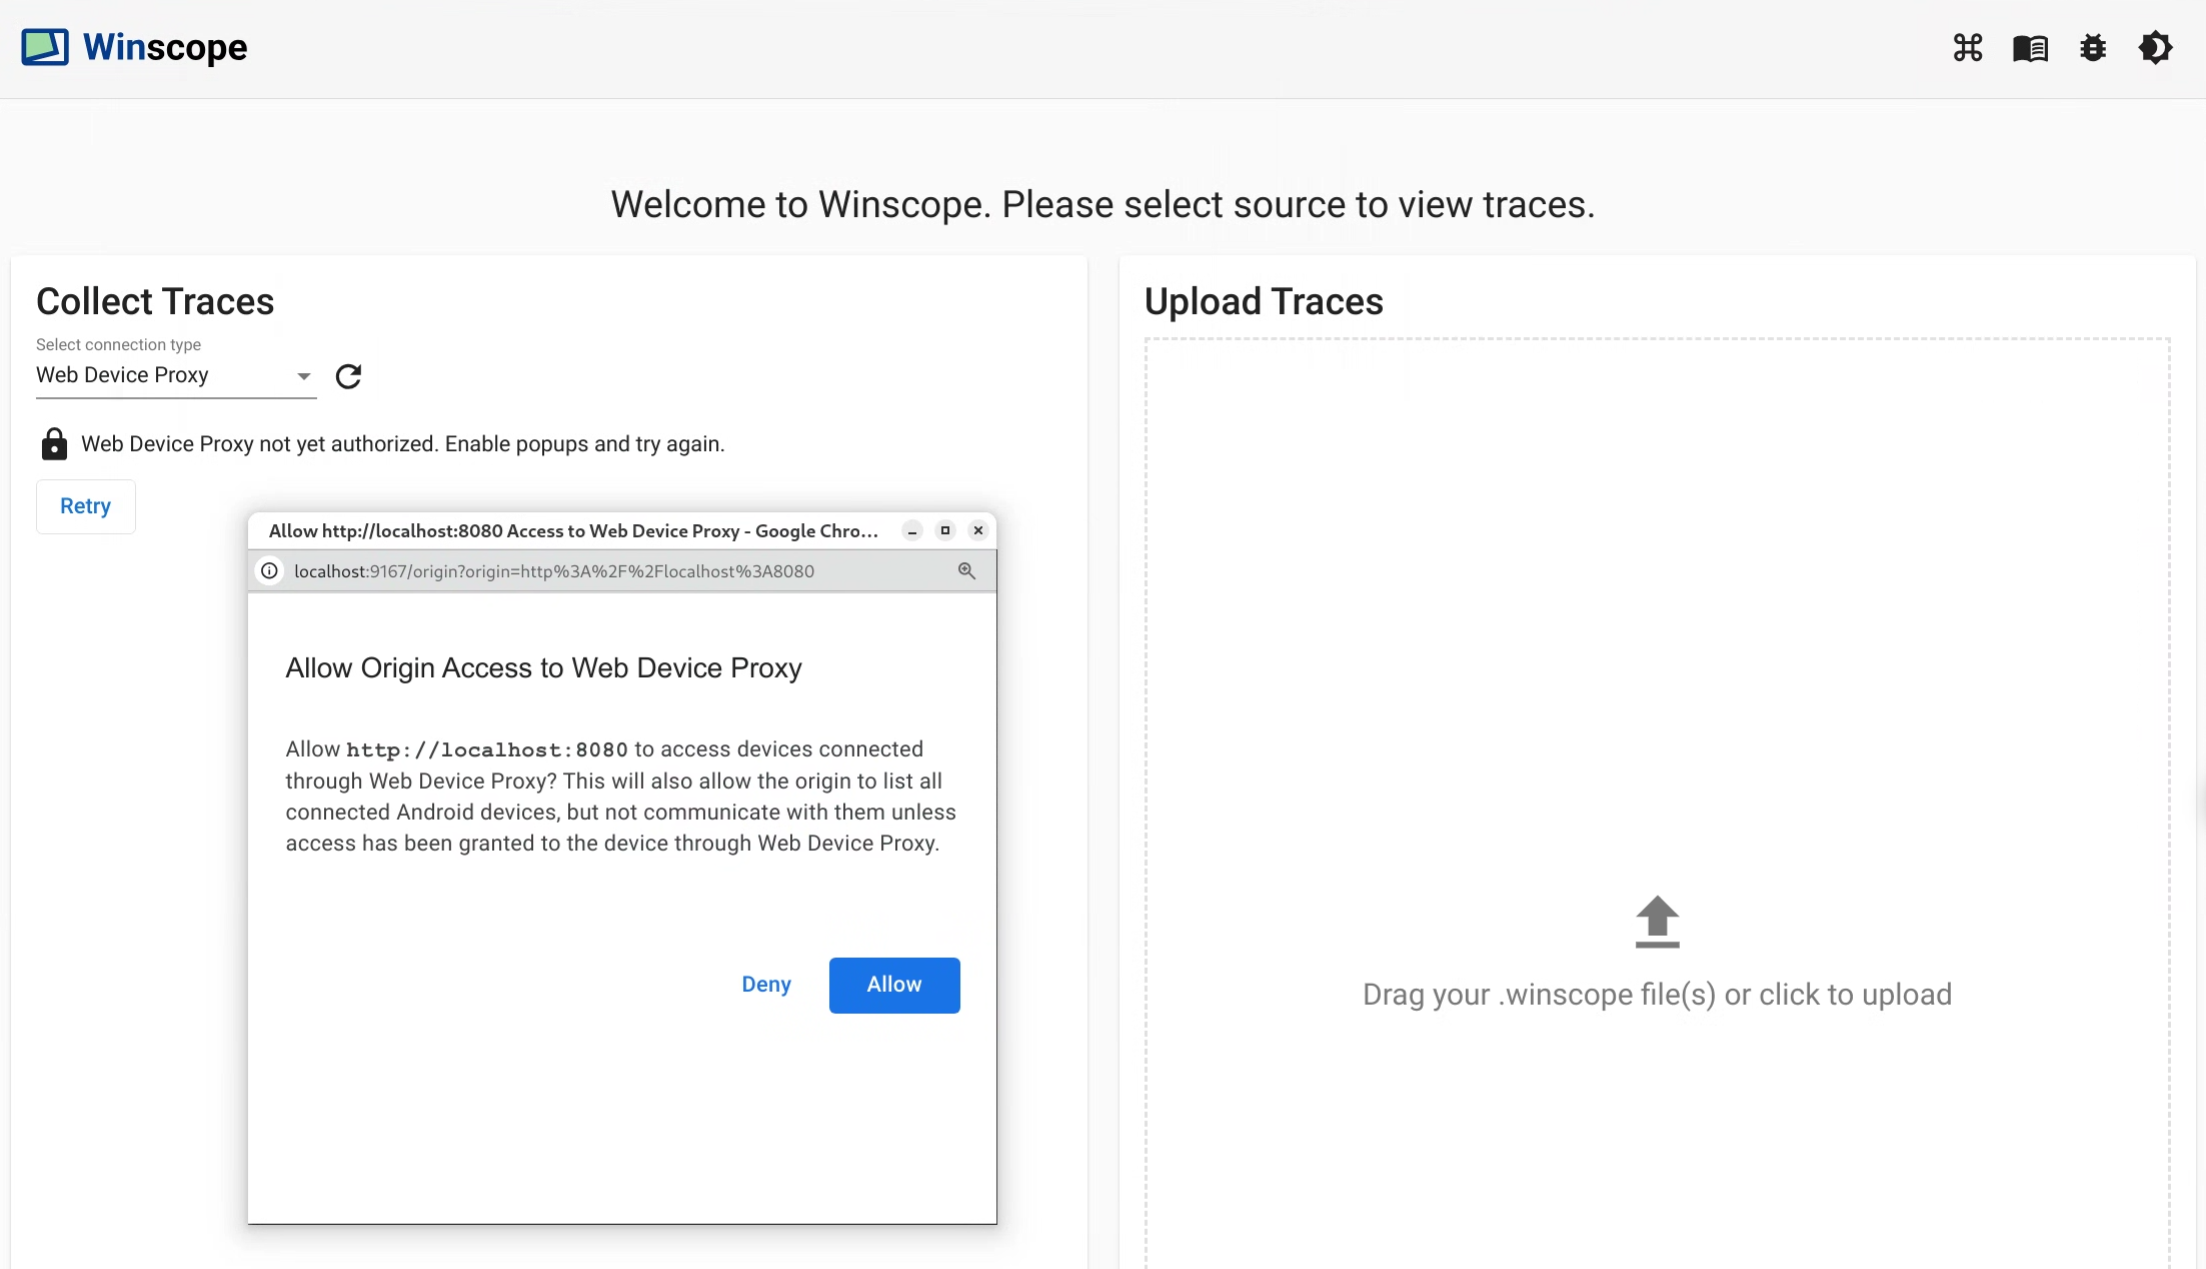
Gambar 4. Mengizinkan origin.
Setujui akses untuk setiap perangkat baru saat pertama kali Anda terhubung ke perangkat.
Jika dialog tidak muncul secara otomatis, klik ikon lock_open di samping
perangkat:
Gambar 5. Beri otorisasi perangkat.
Trace
Ikuti langkah-langkah berikut untuk mengumpulkan rekaman aktivitas:
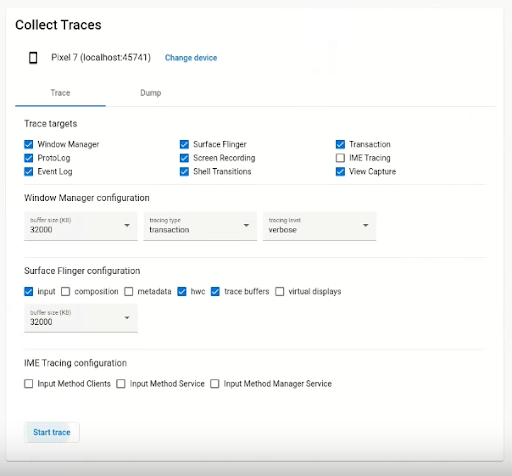
Saat terhubung, untuk memulai proses pengambilan, pilih target dan
konfigurasi setelan. Kemudian, klik Mulai rekaman aktivitas untuk memulai perekaman:
Gambar 6. Mengumpulkan rekaman aktivitas di Winscope.
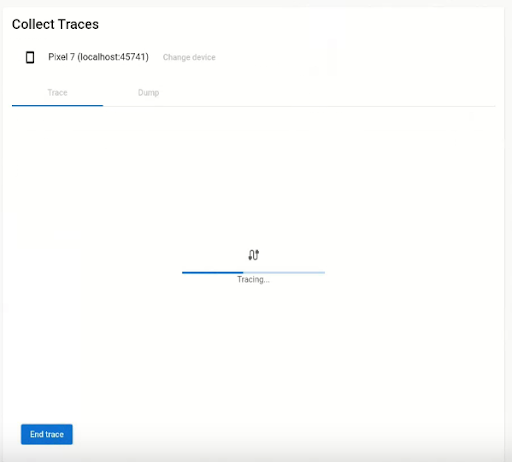
Untuk menghentikan perekaman, klik Akhiri rekaman aktivitas:
Gambar 7. Akhiri rekaman aktivitas di Winscope.
Opsi perekaman aktivitas
Bagian ini menjelaskan opsi untuk setiap jenis rekaman aktivitas.
Perekaman layar
Dengan Winscope, Anda dapat merekam layar beberapa layar. Pilih tampilan
dari menu untuk merekam layar. Jika Anda tidak membuat pilihan, Winscope akan merekam
layar aktif secara default.
SurfaceFlinger
Ukuran buffer: Menyesuaikan ukuran buffer ring dalam memori untuk
rekaman aktivitas SurfaceFlinger. Buffer yang lebih besar memungkinkan pengumpulan lebih banyak data, tetapi meningkatkan penggunaan memori.
Input: Jika platform berisi data input, lacak detail
jendela input.
Komposisi: Melacak jenis komposisi dan area yang terlihat.
Metadata: Melacak metadata platform tambahan, termasuk lapisan
di luar layar.
HWC: Melacak metadata komposer hardware tidak terstruktur tambahan.
Buffer rekaman aktivitas: Mengonfigurasi SurfaceFlinger untuk melacak semua perubahan buffering di
platform. Secara default, SurfaceFlinger melacak status baru hanya saat
geometri diubah.
Tampilan virtual: Menyertakan lapisan tampilan virtual dalam rekaman aktivitas.
WindowManager
Ukuran buffer: Menyesuaikan ukuran buffer ring dalam memori untuk
pelacakan WindowManager. Buffer yang lebih besar memungkinkan pengumpulan lebih banyak data, tetapi
meningkatkan penggunaan memori.
Jenis pelacakan: Menentukan opsi frekuensi untuk mengumpulkan status:
frame: Dalam mode ini, WindowManager akan membuang satu status per
frame, memastikan bahwa hanya status WindowManager yang valid yang diambil. Mode
ini memiliki overhead performa terendah.
transaction: Mode ini mencatat status WindowManager setiap kali
transaksi di-commit. Anda dapat melakukan beberapa transaksi dalam
bingkai, sehingga memungkinkan proses debug status
WindowManager perantara selama frame. Namun, mode ini memiliki overhead performa
yang lebih tinggi dibandingkan dengan mode frame.
Tingkat pelacakan: Menentukan panjang pelacakan WindowManager:
verbose: Mencakup semua jendela dan informasi konfigurasi untuk setiap
jendela. Mode ini memiliki overhead memori dan performa tertinggi.
debug: Menyertakan informasi tentang semua jendela, tetapi hanya mencatat konfigurasi jendela ke dalam log jika berisi konfigurasi penggantian yang diminta.
critical: Menyertakan informasi yang sama dengan mode Debug, tetapi hanya menyertakan
jendela yang terlihat. Mode ini memiliki overhead memori dan performa
terkecil.
Dump
Untuk mengambil dump status menggunakan Winscope, di bagian Collect Traces di halaman beranda,
pilih tab Dump, lalu klik Dump state:
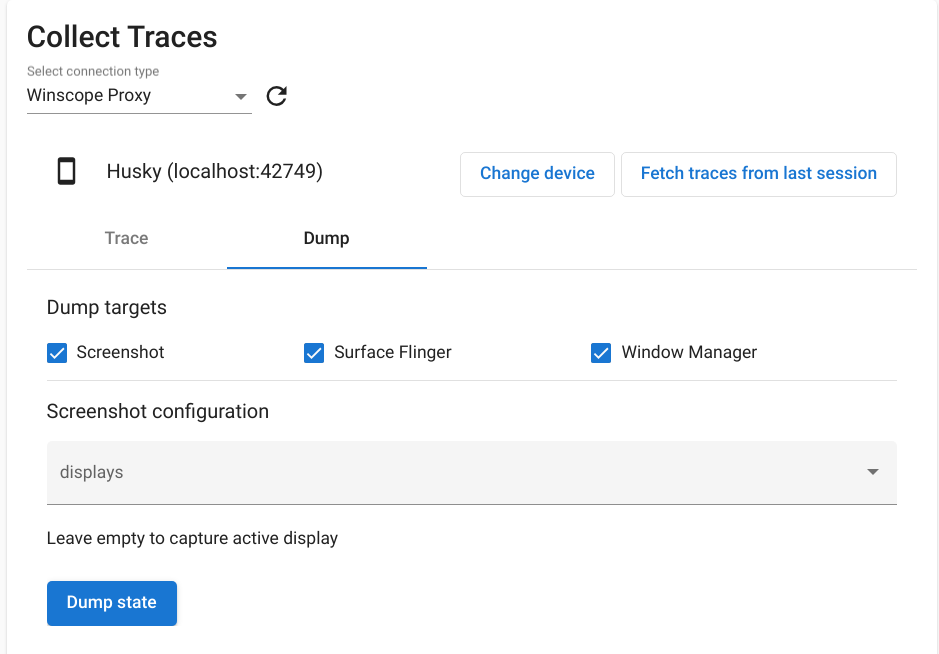
Gambar 8. Status dump di Winscope.
Konfigurasi screenshot
Winscope memungkinkan pengambilan screenshot untuk beberapa layar. Pilih tampilan dari
menu untuk mengambil screenshot. Jika tidak ada pilihan yang dibuat, screenshot akan dikumpulkan untuk
layar yang aktif.
Konten dan contoh kode di halaman ini tunduk kepada lisensi yang dijelaskan dalam Lisensi Konten. Java dan OpenJDK adalah merek dagang atau merek dagang terdaftar dari Oracle dan/atau afiliasinya.
Terakhir diperbarui pada 2025-07-27 UTC.
[[["Mudah dipahami","easyToUnderstand","thumb-up"],["Memecahkan masalah saya","solvedMyProblem","thumb-up"],["Lainnya","otherUp","thumb-up"]],[["Informasi yang saya butuhkan tidak ada","missingTheInformationINeed","thumb-down"],["Terlalu rumit/langkahnya terlalu banyak","tooComplicatedTooManySteps","thumb-down"],["Sudah usang","outOfDate","thumb-down"],["Masalah terjemahan","translationIssue","thumb-down"],["Masalah kode / contoh","samplesCodeIssue","thumb-down"],["Lainnya","otherDown","thumb-down"]],["Terakhir diperbarui pada 2025-07-27 UTC."],[],[],null,["# Capture traces with Winscope\n\n[Run Winscope](/docs/core/graphics/winscope/run) locally or access it\nfrom a web server.\n\nYou can capture traces using Winscope for local development and debugging.\nWinscope uses [adb](https://developer.android.com/tools/adb), which supports\ndevice connection over USB or Wi-Fi.\n\nThe **Collect Traces** screen is displayed on launching Winscope.\n\nDevice connection\n-----------------\n\nYou can connect devices in Winscope using\n[Winscope Proxy](#winscope-proxy-setup)\nor\n[Web Device Proxy](#web-device-proxy-setup).\nBy default, the Winscope homepage shows the **Winscope Proxy** connection setup\nUI.\n\nTo start capturing traces, choose one of the following device connection\nmechanisms.\n\n### Winscope Proxy setup\n\nFollow these steps to set up Winscope Proxy:\n\n1. Under **Collect Traces** on the homepage, choose **Winscope Proxy** in the\n **Select connection type** drop-down:\n\n **Figure 1.** Capture traces using Winscope Proxy.\n2. Launch the Winscope ADB Connect proxy to capture traces directly from your\n browser, by running the following command:\n\n python3 $ANDROID_BUILD_TOP/development/tools/winscope/src/adb/winscope_proxy.py\n\n | **Note:** Python 3.10+ and adb are required.\n3. Note the Winscope proxy token displayed on the terminal after execution.\n\n4. After you launch the Winscope ADB Connect proxy, the screen changes as\n follows. To establish the initial connection to the proxy, input the\n Winscope proxy token from step 3 and click **Connect**.\n\n **Figure 2.** Connect to Winscope Proxy.\n\n### Web Device Proxy setup\n\nFollow these steps to set up Web Device Proxy:\n\n1. Under **Collect Traces** on the homepage, choose **Web Device Proxy** in the\n **Select connection type** drop-down:\n\n **Figure 3.** Capture traces using Web Device Proxy.\n2. If you don't have the Web Device Proxy daemon on your machine, click\n **Install** or run the\n [installer](https://tools.google.com/dlpage/android_web_device_proxy).\n\n | **Note:** Web Device Proxy is not yet supported on Mac.\n3. Approve origin access to Web Device Proxy through the dialog.\n\n **Figure 4.** Authorize origin.\n4. Approve access for each new device the first time you connect to the device.\n If the dialog does not automatically appear, click the `lock_open` icon next\n to the device:\n\n **Figure 5.** Authorize device.\n\nTraces\n------\n\nFollow these steps to collect traces:\n\n1. When connected, to initiate the capture process, select the targets and\n configure the settings. Then click **Start trace** to begin the capture:\n\n **Figure 6.** Collect traces in Winscope.\n2. To stop the capture, click **End trace**:\n\n **Figure 7.** End trace in Winscope.\n\nTrace options\n-------------\n\nThis section describes the options for each trace type.\n\n### Screen recording\n\nWith Winscope, you can record the screen of multiple displays. Choose a display\nfrom the menu to screen record. If you don't make a selection, Winscope records\nthe active display by default.\n| **Note:** Multi-display selection is available only with adb `screenrecord` v1.4 and higher, that is builds from September 2024 on. Single display selection is available for any version earlier than that.\n\n### SurfaceFlinger\n\n- **Buffer size:** Adjusts the size of the in-memory ring buffer for the\n SurfaceFlinger trace. A larger buffer enables the collection of more data\n but increases memory usage.\n\n | **Note:** Buffer size is deprecated starting in Android 15.\n- **Input:** If the surface contains input data, tracks the specifics of\n the input window.\n\n- **Composition:** Traces the composition type and visible region.\n\n- **Metadata:** Traces additional surface metadata, including offscreen\n layers.\n\n | **Warning:** Metadata is highly verbose and requires a large amount of memory.\n- **HWC:** Traces additional unstructured hardware composer metadata.\n\n | **Warning:** HWC is highly verbose and requires a large amount of memory.\n- **Trace buffers:** Configures SurfaceFlinger to trace all buffer changes on\n the surface. By default, SurfaceFlinger traces a new state only when the\n geometry is altered.\n\n- **Virtual displays:** Includes virtual display layers in the trace.\n\n### WindowManager\n\n- **Buffer size:** Adjusts the size of the in-memory ring buffer for the WindowManager trace. A larger buffer enables the collection of more data but increases memory usage.\n- **Tracing type:** Defines the frequency options for collecting states:\n\n - *frame:* In this mode, the WindowManager dumps a single state per frame, ensuring that only valid WindowManager states are captured. This mode has the lowest performance overhead.\n - *transaction:* This mode records a WindowManager state whenever a transaction is committed. You can commit multiple transactions within a frame, so this allows for debugging intermediate WindowManager states during a frame. However, this mode has a higher performance overhead compared to the frame mode.\n- **Tracing level:** Determines the verbosity of the WindowManager traces:\n\n - *verbose:* Includes all windows and configuration information for each window. This mode has the highest memory and performance overhead.\n - *debug:* Includes information about all windows, but logs only the window configuration if it contains a requested override configuration.\n - *critical:* Includes the same information as Debug mode, but includes only visible windows. This mode has the smallest memory and performance overhead.\n\nDumps\n-----\n\nTo take a state dump using Winscope, under **Collect Traces** on the homepage\nselect the **Dump** tab and then click **Dump state**:\n\n**Figure 8.** Dump state in Winscope.\n\n### Screenshot configuration\n\nWinscope allows taking a screenshot for multiple displays. Choose a display from\nthe menu to screenshot. If no selection is made, a screenshot is collected for\nthe active display."]]