Für die Hardwarebewertung wird die folgende Software verwendet:
- Audacity (auf dem PC installiert)
- MATLAB (auf dem PC installiert)
- Haptik-Test-App (auf dem DUT installiert)
Weitere Informationen zu den Systemanforderungen finden Sie unter Audacity für Windows, Audacity für Mac und MATLAB.
Audacity einrichten
Audacity muss so eingerichtet werden, dass die Eingabe von der Sound Blaster-Soundkarte mit einer bestimmten Datenabtastrate erfolgt. Nachdem Sie den Sound Blaster an den USB-Anschluss Ihres Computers angeschlossen haben, öffnen Sie Audacity und folgen Sie dieser Anleitung.
Wählen Sie Line (USB Sound Blaster HD) als Mikrofonquelle aus, indem Sie den CCLD-Ausgang physisch mit dem Line-In-Eingangsanschluss des Sound Blaster verbinden.

Abbildung 1: Mikrofoneingang auswählen
Legen Sie die Abtastrate auf 48 kHz fest, indem Sie im Menü Project Rate (Projektrate) die Option 48000 auswählen.

Abbildung 2: Abtastrate festlegen
MATLAB herunterladen
Laden Sie die MATLAB-Datei herunter.
Extrahieren Sie die Datei und suchen Sie nach
Effect1NEffect2_V1p0_2020PM.m(für Effekt 1 und Effekt 2) undEffect3_V1p0_2020PM.m(für Effekt 3).
Test-App auf dem Smartphone einrichten
In diesem Abschnitt wird beschrieben, wie Sie die Test-App auf dem Smartphone einrichten.
Test-App vorbereiten
- Kopieren Sie den Quellcode aus den Java- und Kotlin-Codeblöcken unten. Wählen Sie die Option aus, die für Sie am besten geeignet ist.
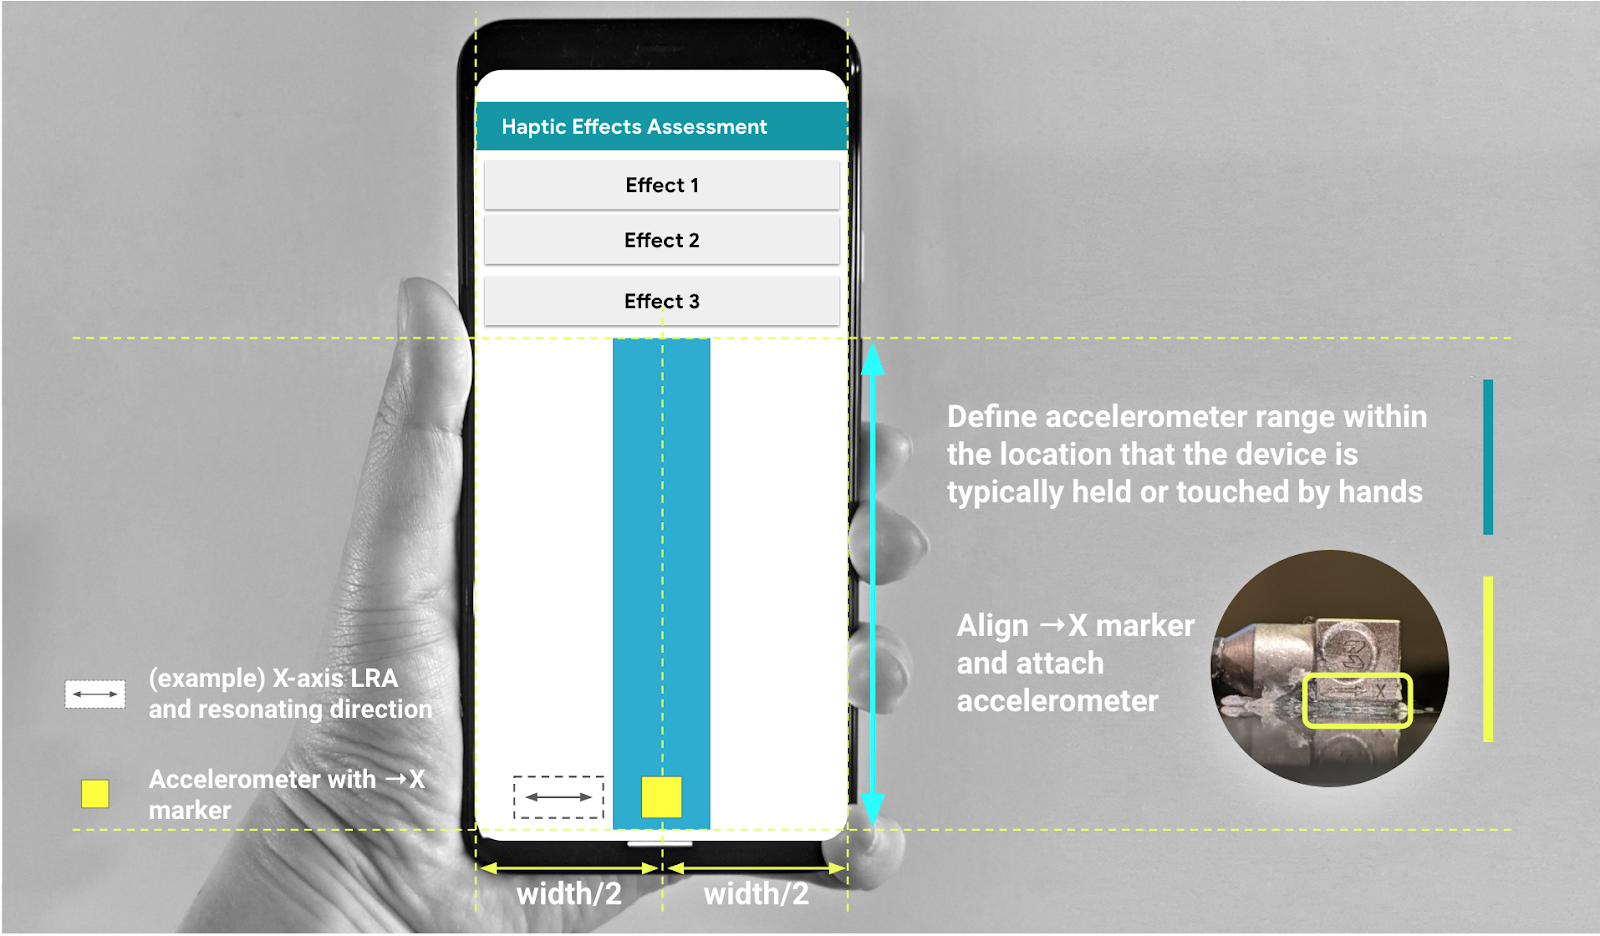
- Schreiben Sie Ihren eigenen Code anhand der in Abbildung 3 dargestellten GUI-Parameter. Passen Sie die Details des Layout-Quellcodes bei Bedarf an Ihr Smartphone an.
Die Benutzeroberfläche muss drei anklickbare Schaltflächen und einen visuellen Indikator enthalten, um den Bereich zu definieren, in dem sich der Beschleunigungsmesser befindet.
- Der Bereich, in dem sich der Beschleunigungsmesser befindet, entspricht dem Bereich des Gerätebildschirms, der normalerweise mit der Hand berührt wird.
- Während dieser Messung können Sie das Beschleunigungsmessgerät im türkisfarbenen Bereich bewegen, um den Bereich des Displays zu finden, der das stärkste Signal erfasst.
Installieren Sie den Code auf dem Android-Gerät.
Es wird dringend empfohlen, den Systemnavigationsmodus auf den Gestenmodus einzustellen, wenn der Standardmodus auf Schaltflächen festgelegt ist.
- Wenn Sie den Gestenmodus einstellen, können Sie den Beschleunigungsmesser so weit wie möglich unten auf dem Smartphone platzieren, ohne dass er durch die Benutzeroberflächen der Systemnavigation des Smartphones unterbrochen wird.
Java-Quellcode
package com.example.hapticeffectassessment;

import static android.os.VibrationEffect.EFFECT_CLICK;

import android.graphics.Color;
import android.os.Bundle;
import android.os.VibrationEffect;
import android.os.Vibrator;
import android.widget.Button;
import androidx.appcompat.app.AppCompatActivity;

public class MainActivity extends AppCompatActivity {

 private static final long oneShotTiming = 20;
 private static final int oneShotAmplitude = 255;

 private static final long[] waveformTimings = {500, 500};
 private static final int[] waveformAmplitudes = {128, 255};

 @Override
 protected void onCreate(Bundle savedInstanceState) {
   super.onCreate(savedInstanceState);
   setContentView(R.layout.activity_main);

   Vibrator vibrator = getSystemService(Vibrator.class);

   // Click R.id.button1 button to generate Effect 1
   findViewById(R.id.button1).setOnClickListener(
       view -> vibrator.vibrate(VibrationEffect.createPredefined(EFFECT_CLICK)));

   // Click R.id.button2 button to generate Effect 2
   findViewById(R.id.button2).setOnClickListener(
       view -> vibrator.vibrate(VibrationEffect.createOneShot(oneShotTiming, oneShotAmplitude)));

   // Click R.id.button3 button to generate Effect 3
   findViewById(R.id.button3).setOnClickListener(view -> {
     vibrator.vibrate(VibrationEffect.createWaveform(waveformTimings, waveformAmplitudes, -1));

     // See quick results of Effect 3
     Button button = (Button) view;
     if (vibrator.hasAmplitudeControl()) {
       button.setText("Effect 3: PASS");
       button.setBackgroundColor(Color.GREEN);
       button.setTextColor(Color.BLACK);
     } else {
       button.setText("Effect 3: FAIL");
       button.setBackgroundColor(Color.RED);
       button.setTextColor(Color.WHITE);
     }
   });
 }
}
Kotlin-Quellcode
package com.example.hapticeffectassessment

import android.graphics.Color
import android.os.Bundle
import android.os.VibrationEffect
import android.os.VibrationEffect.EFFECT_CLICK
import android.os.Vibrator
import android.widget.Button
import androidx.appcompat.app.AppCompatActivity
import kotlinx.android.synthetic.main.activity_main.*

class MainActivityKt : AppCompatActivity() {

 private val oneShotTiming: Long = 20
 private val oneShotAmplitude = 255

 private val waveformTimings = longArrayOf(500, 500)
 private val waveformAmplitudes = intArrayOf(128, 255)

 override fun onCreate(savedInstanceState: Bundle?) {
   super.onCreate(savedInstanceState)
   setContentView(R.layout.activity_main)

   val vibrator = getSystemService(Vibrator::class.java)

   // Click button1 to generate Effect 1
   button1.setOnClickListener {
     vibrator.vibrate(VibrationEffect.createPredefined(EFFECT_CLICK))
   }

   // Click button2 to generate Effect 2
   button2.setOnClickListener {
     vibrator.vibrate(VibrationEffect.createOneShot(oneShotTiming, oneShotAmplitude))
   }

   // Click button3 to generate Effect 3
   button3.setOnClickListener {
     vibrator.vibrate(
       VibrationEffect.createWaveform(waveformTimings, waveformAmplitudes, -1))

     // See quick results of Effect 3
     if (vibrator.hasAmplitudeControl()) {
       button3.text = "Effect 3: PASS"
       button3.setBackgroundColor(Color.GREEN)
       button3.setTextColor(Color.BLACK)
     } else {
       button3.text = "Effect 3: FAIL"
       button3.setBackgroundColor(Color.RED)
       button3.setTextColor(Color.WHITE)
     }
   }
 }
}
Layout-Quellcode (activity_main.xml)
<?xml version="1.0" encoding="utf-8"?>
<androidx.constraintlayout.widget.ConstraintLayout xmlns:android="http://schemas.android.com/apk/res/android"
   xmlns:app="http://schemas.android.com/apk/res-auto"
   xmlns:tools="http://schemas.android.com/tools"
   android:layout_width="match_parent"
   android:layout_height="match_parent"
   tools:context=".MainActivity">

   <Button
       android:id="@+id/button1"
       android:layout_width="350dp"
       android:layout_height="60dp"
       android:layout_marginStart="32dp"
       android:layout_marginTop="5dp"
       android:layout_marginEnd="32dp"
       android:text="Effect 1"
       android:textSize="18sp"
       app:layout_constraintEnd_toEndOf="parent"
       app:layout_constraintStart_toStartOf="parent"
       app:layout_constraintTop_toTopOf="parent" />

   <Button
       android:id="@+id/button2"
       android:layout_width="350dp"
       android:layout_height="60dp"
       android:layout_marginStart="32dp"
       android:layout_marginTop="5dp"
       android:layout_marginEnd="32dp"
       android:text="Effect 2"
       android:textSize="18sp"
       app:layout_constraintEnd_toEndOf="parent"
       app:layout_constraintStart_toStartOf="parent"
       app:layout_constraintTop_toBottomOf="@+id/button1" />

   <Button
       android:id="@+id/button3"
       android:layout_width="350dp"
       android:layout_height="60dp"
       android:layout_marginStart="32dp"
       android:layout_marginTop="5dp"
       android:layout_marginEnd="32dp"
       android:text="Effect 3"
       android:textSize="18sp"
       app:layout_constraintEnd_toEndOf="parent"
       app:layout_constraintStart_toStartOf="parent"
       app:layout_constraintTop_toBottomOf="@+id/button2" />

   <View
       android:id="@+id/divider"
       android:layout_width="363dp"
       android:layout_height="1dp"
       android:layout_marginStart="32dp"
       android:layout_marginTop="10dp"
       android:layout_marginEnd="32dp"
       android:background="?android:attr/listDivider"
       app:layout_constraintEnd_toEndOf="parent"
       app:layout_constraintHorizontal_bias="0.5"
       app:layout_constraintStart_toStartOf="parent"
       app:layout_constraintTop_toBottomOf="@+id/button3" />

   <androidx.constraintlayout.widget.ConstraintLayout
       android:layout_width="363dp"
       android:layout_height="0dp"
       app:layout_constraintBottom_toBottomOf="parent"
       app:layout_constraintEnd_toEndOf="parent"
       app:layout_constraintHorizontal_bias="0.5"
       app:layout_constraintStart_toStartOf="parent"
       app:layout_constraintTop_toBottomOf="@+id/divider">

       <ImageView
           android:id="@+id/imageView"
           android:layout_width="wrap_content"
           android:layout_height="wrap_content"
           android:adjustViewBounds="true"
           android:scaleType="fitXY"
           app:layout_constraintBottom_toBottomOf="parent"
           app:layout_constraintEnd_toEndOf="parent"
           app:layout_constraintHorizontal_bias="0.5"
           app:layout_constraintStart_toStartOf="parent"
           app:layout_constraintTop_toTopOf="parent"
           app:srcCompat="@drawable/bluebar" />
   </androidx.constraintlayout.widget.ConstraintLayout>

</androidx.constraintlayout.widget.ConstraintLayout>

Abbildung 3: Befestigen Sie den Beschleunigungsmesser an der Stelle, die in der Benutzeroberfläche empfohlen wird.
