2025년 3월 27일부터 AOSP를 빌드하고 기여하려면 aosp-main
대신 android-latest-release
를 사용하는 것이 좋습니다. 자세한 내용은 AOSP 변경사항을 참고하세요.
사용자 빌드에서 USB 디버깅을 자동으로 사용 설정
컬렉션을 사용해 정리하기
내 환경설정을 기준으로 콘텐츠를 저장하고 분류하세요.
사용자 빌드를 기기에 플래시한 후에는 USB 디버깅을 다시 사용 설정해야 합니다. OmniLab ATS는 일련의 UI 명령어를 기기에 전송하는 AOA 기기 작업을 사용하여 이 단계를 자동화할 수 있습니다.
AOA 명령어 기록
먼저 WebAOA 명령어 편집 도구를 사용하여 USB 디버깅을 사용 설정하는 명령어 목록을 기록합니다.
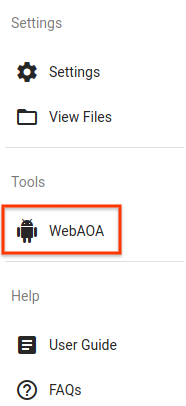
그림 1. OmniLab ATS에서 WebAOA 명령어 편집 도구에 연결
기본적으로 http://localhost:8000/webaoa에서도 액세스할 수 있습니다.
WebAOA를 사용하면 시뮬레이션된 터치스크린으로 로컬 기기를 조작하고 UI 상호작용을 기록할 수 있습니다.
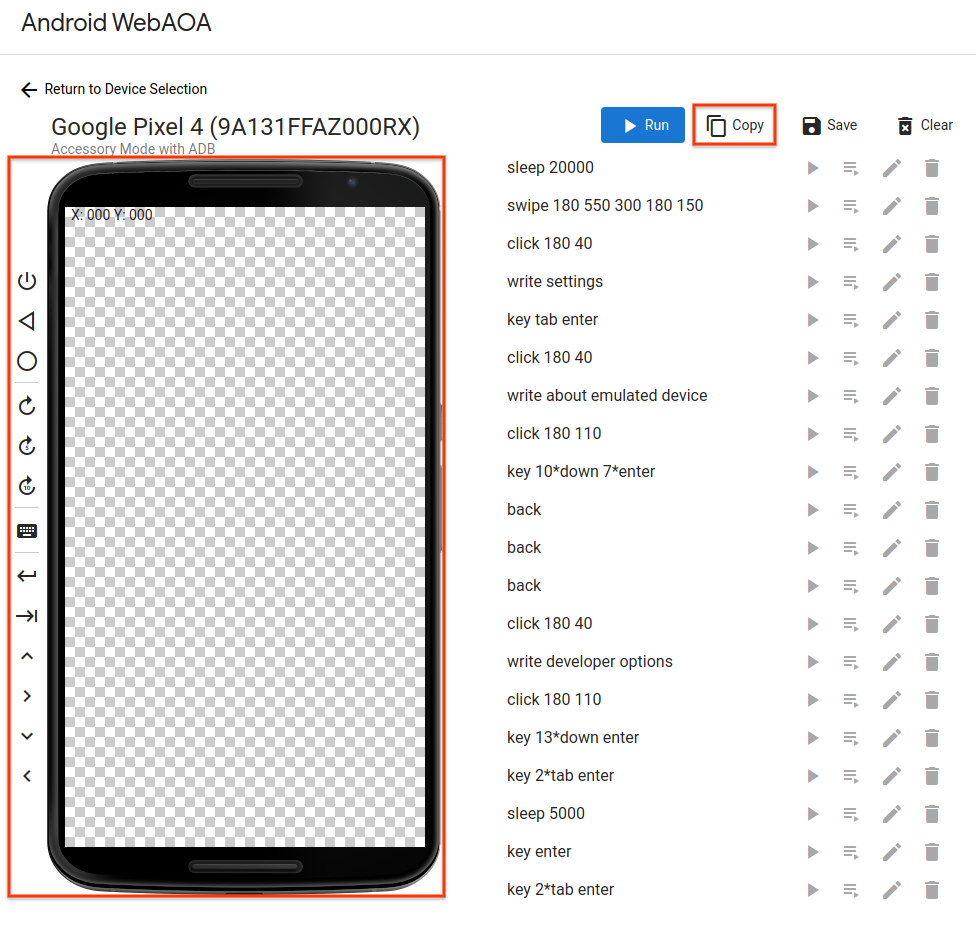
그림 2. WebAOA에서 USB 디버깅을 사용 설정하는 명령어를 수정합니다.
네 가지 유형의 명령어가 지원됩니다.
터치스크린에서 클릭 및 스와이프(click X Y
및 swipe X1 Y1 DURATION X2 Y2
)
기기 버튼 누르기(back
, home
, wake
)
텍스트 작성 및 키 조합 누르기(write TEXT
및 key [KEY ...]
)
지정된 기간 대기(sleep DURATION
)
명령어 기록을 마치면 클립보드에 복사하거나 파일로 저장할 수 있습니다.
AOA 기기 작업 만들기
USB 디버깅을 자동으로 다시 사용 설정하려면 기록된 명령어를 기기 작업에 추가해야 합니다.
새 기기 작업을 만들고 클래스 이름을 com.android.tradefed.targetprep.AoaTargetPreparer
로 설정하여 TF Target Preparer를 추가합니다.
WebAOA에 기록된 명령어를 action
옵션에 복사합니다.
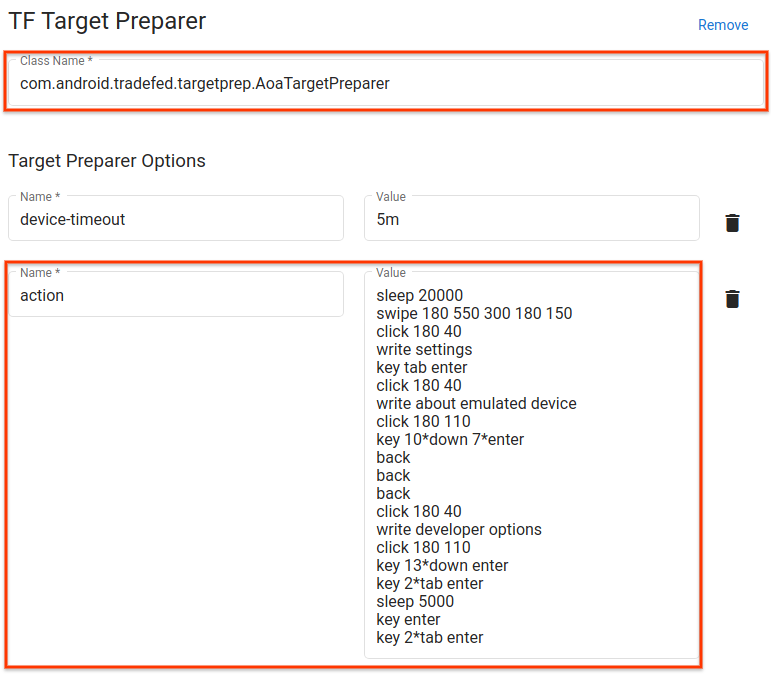
그림 3. Android 10 GSI에서 USB 디버깅을 사용 설정하는 AOA 기기 작업
AOA 기기 작업 사용
테스트 실행을 예약할 때 AOA 기기 작업을 추가하고 기기 플래시 작업 바로 뒤에 배치합니다.
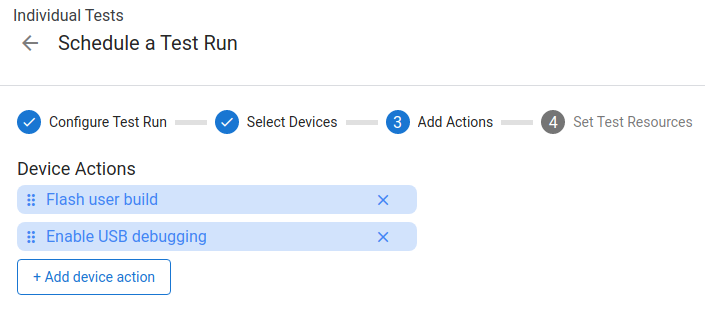
그림 4. 사용자 빌드를 플래시하고 USB 디버깅을 다시 사용 설정하기 위한 실행 예약
이 페이지에 나와 있는 콘텐츠와 코드 샘플에는 콘텐츠 라이선스에서 설명하는 라이선스가 적용됩니다. 자바 및 OpenJDK는 Oracle 및 Oracle 계열사의 상표 또는 등록 상표입니다.
최종 업데이트: 2025-07-27(UTC)
[[["이해하기 쉬움","easyToUnderstand","thumb-up"],["문제가 해결됨","solvedMyProblem","thumb-up"],["기타","otherUp","thumb-up"]],[["필요한 정보가 없음","missingTheInformationINeed","thumb-down"],["너무 복잡함/단계 수가 너무 많음","tooComplicatedTooManySteps","thumb-down"],["오래됨","outOfDate","thumb-down"],["번역 문제","translationIssue","thumb-down"],["샘플/코드 문제","samplesCodeIssue","thumb-down"],["기타","otherDown","thumb-down"]],["최종 업데이트: 2025-07-27(UTC)"],[],[],null,["# Enable USB debugging on user builds automatically\n\nAfter flashing a user build onto a device, you need to re-enable USB\ndebugging. OmniLab ATS can automate this step using *AOA device actions*, which\nsend a series of UI commands to a device.\n| **Note:** This procedure uses the [Android Open Accessory protocol](/docs/core/interaction/accessories/protocol), which supports Android 4.1+ and doesn't require ADB.\n\nRecord the AOA commands\n-----------------------\n\nFirst, use the *WebAOA command editing tool* to record the list of commands to\nenable USB debugging.\n\n**Figure 1.** Link to the WebAOA command editing tool in OmniLab ATS.\n\nIt is also accessible at \u003chttp://localhost:8000/webaoa\u003e\nby default.\n\nWebAOA lets you manipulate a local device using a simulated touchscreen and\nrecord your UI interactions.\n\n**Figure 2.** Editing the commands for enabling USB debugging in WebAOA.\n\nFour types of commands are supported:\n\n- Clicking and swiping on the touchscreen\n (`click `\u003cvar translate=\"no\"\u003eX\u003c/var\u003e` `\u003cvar translate=\"no\"\u003eY\u003c/var\u003e and\n `swipe `\u003cvar translate=\"no\"\u003eX1\u003c/var\u003e` `\u003cvar translate=\"no\"\u003eY1\u003c/var\u003e` `\u003cvar translate=\"no\"\u003eDURATION\u003c/var\u003e` `\u003cvar translate=\"no\"\u003eX2\u003c/var\u003e` `\u003cvar translate=\"no\"\u003eY2\u003c/var\u003e)\n\n- Pressing device buttons (`back`, `home`, and `wake`)\n\n- Writing text and pressing key combinations\n (`write `\u003cvar translate=\"no\"\u003eTEXT\u003c/var\u003e and\n `key [`\u003cvar translate=\"no\"\u003eKEY\u003c/var\u003e` ...]`)\n\n- Waiting for a specified duration (`sleep `\u003cvar translate=\"no\"\u003eDURATION\u003c/var\u003e)\n\nWhen you are finished recording commands, you can copy them to your clipboard or\nsave them to a file.\n\nCreate an AOA device action\n---------------------------\n\nTo automatically re-enable USB debugging, the recorded commands need to be added\nto a device action.\n\n[Create a new device action](/docs/core/tests/development/android-test-station/ats-user-guide#create-a-new-device-action) and\nadd a TF Target Preparer with its class name set to\n[`com.android.tradefed.targetprep.AoaTargetPreparer`](/reference/tradefed/com/android/tradefed/targetprep/AoaTargetPreparer).\nCopy the commands recorded in WebAOA into its `action` option.\n\n**Figure 3.** AOA device action for enabling USB debugging on Android 10 GSI.\n\nUse an AOA device action\n------------------------\n\nWhen scheduling a test run, add your AOA device action and place it directly\nafter your device-flashing action.\n\n**Figure 4.** Scheduling a run to flash a user build and re-enable USB\ndebugging."]]