自 2025 年 3 月 27 日起,我們建議您使用 android-latest-release
而非 aosp-main
建構及貢獻 AOSP。詳情請參閱「Android 開放原始碼計畫變更」。
VTS 資訊主頁設定
透過集合功能整理內容
你可以依據偏好儲存及分類內容。
VTS 資訊主頁提供使用者後端和使用者介面 (UI),方便查看 VTS 持續整合系統的測試結果。它支援以測試為導向的開發作業,並提供測試狀態通知等工具,協助開發人員在開發週期中找出並避免回歸區域 (包括測試監控和分類支援)。
VTS 資訊主頁 UI 支援 VTS 基礎架構提供的功能 (例如原生程式碼涵蓋率),並提供持續效能監控功能,以便開發經過最佳化且具備良好特徵的效能工具。
需求條件
您必須啟用下列服務,才能使用 VTS 資訊主頁:
查看測試涵蓋率時,系統會使用 REST API 連線至原始碼伺服器 (例如 Gerrit),讓網路服務依據現有的存取控制清單擷取原始原始碼。
建築
VTS 資訊主頁採用下列架構:
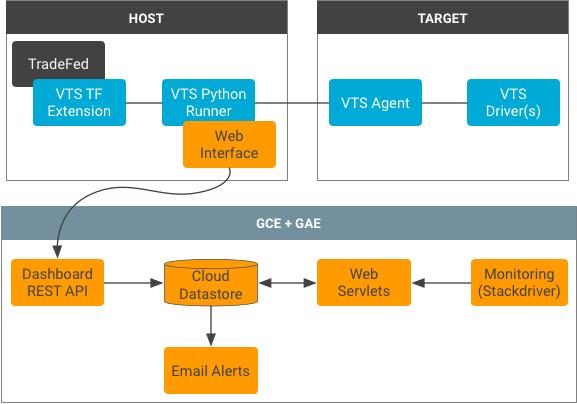
圖 1. VTS 資訊主頁架構。
測試狀態結果會透過 REST 介面持續上傳至 Cloud Datastore 資料庫。VTS 執行程式會自動處理結果,並使用 Protobuf 格式序列化結果。
Web Servlet 是使用者的主要存取點,可提供 Datastore 資料庫的資料並加以處理。Servlet 包括:用於提供所有測試的主 Servlet、用於管理使用者收藏的偏好設定 Servlet、用於填入測試表格的結果 Servlet、用於準備剖析資料的圖表 Servlet,以及用於為用戶端準備涵蓋率資料的涵蓋率 Servlet。
每個測試模組都有專屬的 Datastore 祖系樹狀圖,且測試結果會以測試開始時間的 Unix 時間戳記建立索引。資料庫中的涵蓋率資料會與測試結果一併儲存,做為計數向量 (即原始來源檔案中的每個行) 和用於從原始碼伺服器擷取原始碼的識別資訊。
通知服務會使用工作佇列執行,識別測試案例狀態變更,並通知訂閱者。狀態資訊會儲存在狀態表中,以便追蹤資料的新鮮度和現有的失敗情形。這樣一來,通知服務就能提供有關個別測試案例失敗和修正方式的詳細資訊。
程式碼結構
VTS 資訊主頁必要元件包括以 Java 實作的 servlet、前端 JSP、CSS 樣式表和設定檔。下列清單詳細說明這些元件的位置和說明 (所有路徑皆相對於 test/vts/web/dashboard
):
pom.xml
設定檔,用於定義環境變數和依附元件。
src/main/java/com/android/vts/api/
包含用於透過 REST 與資料互動的端點。
src/main/java/com/android/vts/entity/
包含 Datastore 實體的 Java 模型。
src/main/java/com/android/vts/proto/
包含 Protobuf 的 Java 檔案,包括 VtsReportMessage.java
,這是 Protobuf 類型的 Java 實作,用於描述 VTS 測試結果。
src/main/java/com/android/vts/servlet/
包含 servlet 的 Java 檔案。
src/main/java/com/android/vts/util/
包含用於公用函式和 servlet 使用的類別的 Java 檔案。
src/test/java/com/android/vts/
包含 servlet 和 utils 的 UI 測試。
src/main/webapp/
包含與 UI 相關的檔案 (JSP、CSS、XML):
js/
:包含網頁使用的 JavaScript 檔案。
WEB-INF/
:包含設定和 UI 檔案。
jsp/
:包含每個網頁的 JSP 檔案。
appengine-web.xml
設定檔,其中會將環境變數載入變數。
web.xml
設定檔,用於定義 Servlet 對應和安全性限制。
cron.xml
定義排程工作 (即通知服務) 的設定檔。
設定資訊主頁
如何設定 VTS 資訊主頁:
- 建立 Google Cloud App Engine 專案,並安裝以下項目來設定部署主機:
- Java 8
- Google App Engine SDK
- Maven
- 在 Google Cloud API Manager 中產生 OAuth 2.0 用戶端 ID。
- 建立服務帳戶和金鑰檔案。
- 將電子郵件地址新增至 App Engine Email API 已授權的寄件者清單。
- 設定 Google Analytics 帳戶。
- 在資訊主頁
pom.xml
中指定環境變數:
- 使用 OAuth 2.0 ID 設定用戶端 ID (請參閱步驟 2)。
- 使用 keyfile (步驟 3) 中的 ID 設定服務用戶端 ID。
- 指定快訊的寄件者電子郵件地址 (請參閱步驟 4)。
- 指定要傳送所有電子郵件的電子郵件網域。
- 指定 Gerrit REST 伺服器的位址。
- 指定要用於 Gerrit REST 伺服器的 OAuth 2.0 範圍。
- 指定 Google Analytics ID (請參閱步驟 5)。
- 建構並部署專案。
- 在終端機中執行
mvn clean appengine:update
。
安全性考量
您必須能存取原始程式碼,才能取得完整的測試範圍資訊。不過,某些程式碼可能屬於敏感性質,如果新增其他閘道,可能會讓人利用現有的存取控制清單。
為避免這項威脅,資訊主頁不會提供含有涵蓋率資訊的原始碼,而是直接處理涵蓋率向量 (即執行計數向量,對應至來源檔案中的行)。除了涵蓋率向量之外,資訊主頁也會接收 Git 專案名稱和路徑,讓用戶端可以從外部原始碼 API 擷取程式碼。用戶端瀏覽器會接收這項資訊,並在 JavaScript 中使用跨來源資源共用 (CORS) 功能,向原始碼伺服器查詢原始原始碼;產生的程式碼會與涵蓋率向量結合,產生顯示內容。
由於資訊主頁會使用使用者的 Cookie 驗證外部服務 (也就是說,無法直接存取原始碼的使用者無法利用資訊主頁查看機密資訊),因此這種直接方法不會擴大攻擊面。
這個頁面中的內容和程式碼範例均受《內容授權》中的授權所規範。Java 與 OpenJDK 是 Oracle 和/或其關係企業的商標或註冊商標。
上次更新時間:2025-07-27 (世界標準時間)。
[[["容易理解","easyToUnderstand","thumb-up"],["確實解決了我的問題","solvedMyProblem","thumb-up"],["其他","otherUp","thumb-up"]],[["缺少我需要的資訊","missingTheInformationINeed","thumb-down"],["過於複雜/步驟過多","tooComplicatedTooManySteps","thumb-down"],["過時","outOfDate","thumb-down"],["翻譯問題","translationIssue","thumb-down"],["示例/程式碼問題","samplesCodeIssue","thumb-down"],["其他","otherDown","thumb-down"]],["上次更新時間:2025-07-27 (世界標準時間)。"],[],[],null,["# VTS Dashboard setup\n\nThe VTS Dashboard provides a user backend and user interface (UI) for viewing\ntest results from the VTS continuous integration system. It supports test-driven\ndevelopment with tools such as test status notifications to help developers to\nlocate and prevent regression areas during the development cycle (include test\nmonitoring and triaging support).\n\n\nThe VTS Dashboard UI supports features (such as native code coverage) provided\nby the VTS infrastructure and offers continuous performance monitoring to enable\nthe development of optimized and well-characterized performance tools.\n\nRequirements\n------------\n\n\nThe following services are required to use the VTS Dashboard:\n\n- [Apache Maven](https://maven.apache.org/), for building and deployment\n- [Google Cloud\n App Engine](https://cloud.google.com/appengine), for web-service hosting\n- [Google\n Cloud Datastore](https://cloud.google.com/datastore/docs/), for storage\n- [Google\n Stackdriver](http://www.stackdriver.com/), for monitoring\n\n\nViewing [test coverage](/docs/core/tests/vts/ui#coverage) relies on a REST API to a\nsource code server (e.g. Gerrit), which enables the web service to fetch\noriginal source code according to existing access control lists.\n\nArchitecture\n------------\n\n\nThe VTS Dashboard uses the following architecture:\n**Figure 1**. VTS Dashboard architecture.\n\n\nTest status results are continuously uploaded to the Cloud Datastore database\nvia a REST interface. The VTS runner automatically processes the results and\nserializes them using the Protobuf format.\n\n\nWeb servlets form the primary access point for users, delivering and processing\ndata from the Datastore database. The servlets include: a main servlet for\ndelivering all of the tests, a preferences servlet for managing user favorites,\na results servlet for populating a test table, a graph servlet for preparing\nprofiling data, and a coverage servlet for preparing coverage data for the\nclient.\n\n\nEach test module has its own Datastore ancestry tree and test results are\nindexed with the Unix timestamp of the test start time. Coverage data in the\ndatabase is stored with the test results as a vector of counts (i.e. for each\nline in the original source file) and identifying information to fetch the\nsource code from a source code server.\n\n\nThe notification service runs using task queues, identifying test case status\nchanges, and notifying subscribers. Stateful information is stored in a status\ntable to keep track of data freshness and existing failures. This allows for the\nnotification service to provide rich information about individual test case\nfailures and fixes.\n\nCode structure\n--------------\n\n\nVTS Dashboard essential components include the servlets implemented in Java,\nthe front-end JSPs, CSS stylesheets, and configuration files. The following list\ndetails the locations and descriptions of these components (all paths relative\nto `test/vts/web/dashboard`):\n\n- `pom.xml` \n Settings file where environment variables and dependencies are defined.\n- `src/main/java/com/android/vts/api/` \n Contains endpoints for interacting with the data via REST.\n- `src/main/java/com/android/vts/entity/` \n Contains Java models of the Datastore entities.\n- `src/main/java/com/android/vts/proto/` \n Contains Java files for Protobuf, including `VtsReportMessage.java`, which is a Java implementation of Protobuf type used to describe VTS test results.\n- `src/main/java/com/android/vts/servlet/` \n Contains Java files for servlets.\n- `src/main/java/com/android/vts/util/` \n Contains Java files for utility functions and classes used by the servlets.\n- `src/test/java/com/android/vts/` \n Contains UI tests for the servlets and utils.\n- `src/main/webapp/` \n Contains files related to the UI (JSP, CSS, XML):\n - `js/`. Contains Javascript files used by the web pages.\n - `WEB-INF/`. Contains configuration and UI files.\n - `jsp/`. Contains the JSP files for each web page.\n- `appengine-web.xml` \n Settings file where environment variables are loaded into variables.\n- `web.xml` \n Settings file where servlet mappings and security constraints are defined.\n- `cron.xml` \n Settings file defining scheduled tasks (i.e. the notifications service).\n\nSet up the Dashboard\n--------------------\n\n\nTo set up the VTS Dashboard:\n\n1. Create a Google Cloud App Engine Project and set up the deployment host by installing:\n - Java 8\n - Google App Engine SDK\n - Maven\n2. Generate an OAuth 2.0 Client ID in the Google Cloud API Manager.\n3. Create a Service Account and create a keyfile.\n4. Add an email address to the App Engine Email API Authorized Senders List.\n5. Set up a Google Analytics Account.\n6. Specify environment variables in the Dashboard `pom.xml`:\n - Set the client ID with the OAuth 2.0 ID (from step 2).\n - Set the service client ID with the identifier included in the keyfile (from step 3).\n - Specify the sender email address for alerts (from step 4).\n - Specify an email domain to which all emails will be sent.\n - Specify the address to the Gerrit REST server.\n - Specify the OAuth 2.0 scope to use for the Gerrit REST server.\n - Specify the Google Analytics ID (from step 5).\n - Build and deploy the project.\n7. In a terminal, run `mvn clean appengine:update`.\n\nSecurity considerations\n-----------------------\n\n\nRobust coverage information requires access to the original source code.\nHowever, some code may be sensitive and an additional gateway to it may allow\nfor exploitation of existing access control lists.\n\n\nTo avoid this threat, instead of serving the source code with the coverage\ninformation, the Dashboard directly handles a coverage vector (i.e., a vector of\nexecution counts mapping to lines in a source file). Along with the coverage\nvector, the Dashboard receives a Git project name and path so the client can\nfetch the code from an external source code API. The client browser receives\nthis information and uses cross-origin resource sharing (CORS) in Javascript to\nquery the source code server for the original source code; the resulting code is\ncombined with the coverage vector to produce a display.\n\n\nThis direct approach does not widen the attack surface because the Dashboard\nuses the user's cookies to authenticate with an outside service (meaning a user\nwho cannot access source code directly cannot exploit the Dashboard to view\nsensitive information)."]]