
Donanım değerlendirmesinde aşağıdaki yazılımlar kullanılır:
- Audacity (PC'ye yüklenmiş olmalıdır)
- MATLAB (PC'ye yüklenmiş olmalıdır)
- Dokunma teknolojisi test uygulaması (DUT'a yüklenir)
Sistem gereksinimleri hakkında daha fazla bilgi edinmek için Windows için Audacity, Mac için Audacity ve MATLAB sayfalarını inceleyin.
Audacity'yi kurma
Audacity, Sound Blaster ses kartından belirli bir veri örnekleme hızında giriş alacak şekilde ayarlanmalıdır. Sound Blaster'ı bilgisayarınızın USB bağlantı noktasına bağladıktan sonra Audacity'yi açın ve aşağıdaki talimatları uygulayın.
CCLD çıkışını Sound Blaster'ın Line In giriş bağlantı noktasına fiziksel olarak bağlayarak giriş mikrofon kaynağı olarak Line (USB Sound Blaster HD)'yi seçin.

Şekil 1. Mikrofon girişini seçme
Project Rate (Proje Hızı) menüsünde 48000'i seçerek örnekleme hızını 48 kHz olarak ayarlayın.

Şekil 2. Örnekleme hızını ayarlama
MATLAB'i indirme
MATLAB dosyasını indirin.
Dosyayı çıkarın ve
Effect1NEffect2_V1p0_2020PM.m(Efekt 1 ve Efekt 2 için) ileEffect3_V1p0_2020PM.m(Efekt 3 için) simgelerini bulun.
Test uygulamasını telefonda ayarlama
Bu bölümde, test uygulamasının telefonda nasıl ayarlanacağı açıklanmaktadır.
Test uygulamasına hazırlanma
- Aşağıdaki Java ve Kotlin kod bloklarından kaynak kodu kopyalayın. Size en uygun olanı seçin.
- Şekil 3'te gösterilen GUI parametrelerini kullanarak kendi kodunuzu yazın. Gerekirse düzen kaynak kodunun ayrıntılarını telefonunuza uyacak şekilde ayarlayın.
GUI'nizin, ivme ölçerin yerleştirileceği alanı tanımlamak için üç tıklanabilir düğme ve görsel bir gösterge içerdiğinden emin olun.
- İvmeyi yerleştirme alanı, cihazın ekranında elle sıkça dokunulan alanı temsil eder.
- Bu ölçüm sırasında, en güçlü sinyali alan ekran bölgesini bulmak için ivmeölçeri turkuaz alan içinde hareket ettirebilirsiniz.
Kodu Android cihaza yükleyin.
Varsayılan mod düğmeler olarak ayarlanmışsa sistem gezinme modunu hareket moduna ayarlamanız önemle tavsiye edilir.
- Hareket modunu ayarlayarak, telefonun sistem gezinme GUI'leri tarafından kesintiye uğramadan ivmeölçeri mümkün olduğunca telefonun altına yerleştirebilirsiniz.
Java kaynak kodu
package com.example.hapticeffectassessment;

import static android.os.VibrationEffect.EFFECT_CLICK;

import android.graphics.Color;
import android.os.Bundle;
import android.os.VibrationEffect;
import android.os.Vibrator;
import android.widget.Button;
import androidx.appcompat.app.AppCompatActivity;

public class MainActivity extends AppCompatActivity {

 private static final long oneShotTiming = 20;
 private static final int oneShotAmplitude = 255;

 private static final long[] waveformTimings = {500, 500};
 private static final int[] waveformAmplitudes = {128, 255};

 @Override
 protected void onCreate(Bundle savedInstanceState) {
   super.onCreate(savedInstanceState);
   setContentView(R.layout.activity_main);

   Vibrator vibrator = getSystemService(Vibrator.class);

   // Click R.id.button1 button to generate Effect 1
   findViewById(R.id.button1).setOnClickListener(
       view -> vibrator.vibrate(VibrationEffect.createPredefined(EFFECT_CLICK)));

   // Click R.id.button2 button to generate Effect 2
   findViewById(R.id.button2).setOnClickListener(
       view -> vibrator.vibrate(VibrationEffect.createOneShot(oneShotTiming, oneShotAmplitude)));

   // Click R.id.button3 button to generate Effect 3
   findViewById(R.id.button3).setOnClickListener(view -> {
     vibrator.vibrate(VibrationEffect.createWaveform(waveformTimings, waveformAmplitudes, -1));

     // See quick results of Effect 3
     Button button = (Button) view;
     if (vibrator.hasAmplitudeControl()) {
       button.setText("Effect 3: PASS");
       button.setBackgroundColor(Color.GREEN);
       button.setTextColor(Color.BLACK);
     } else {
       button.setText("Effect 3: FAIL");
       button.setBackgroundColor(Color.RED);
       button.setTextColor(Color.WHITE);
     }
   });
 }
}
Kotlin kaynak kodu
package com.example.hapticeffectassessment

import android.graphics.Color
import android.os.Bundle
import android.os.VibrationEffect
import android.os.VibrationEffect.EFFECT_CLICK
import android.os.Vibrator
import android.widget.Button
import androidx.appcompat.app.AppCompatActivity
import kotlinx.android.synthetic.main.activity_main.*

class MainActivityKt : AppCompatActivity() {

 private val oneShotTiming: Long = 20
 private val oneShotAmplitude = 255

 private val waveformTimings = longArrayOf(500, 500)
 private val waveformAmplitudes = intArrayOf(128, 255)

 override fun onCreate(savedInstanceState: Bundle?) {
   super.onCreate(savedInstanceState)
   setContentView(R.layout.activity_main)

   val vibrator = getSystemService(Vibrator::class.java)

   // Click button1 to generate Effect 1
   button1.setOnClickListener {
     vibrator.vibrate(VibrationEffect.createPredefined(EFFECT_CLICK))
   }

   // Click button2 to generate Effect 2
   button2.setOnClickListener {
     vibrator.vibrate(VibrationEffect.createOneShot(oneShotTiming, oneShotAmplitude))
   }

   // Click button3 to generate Effect 3
   button3.setOnClickListener {
     vibrator.vibrate(
       VibrationEffect.createWaveform(waveformTimings, waveformAmplitudes, -1))

     // See quick results of Effect 3
     if (vibrator.hasAmplitudeControl()) {
       button3.text = "Effect 3: PASS"
       button3.setBackgroundColor(Color.GREEN)
       button3.setTextColor(Color.BLACK)
     } else {
       button3.text = "Effect 3: FAIL"
       button3.setBackgroundColor(Color.RED)
       button3.setTextColor(Color.WHITE)
     }
   }
 }
}
Düzen kaynak kodu (activity_main.xml)
<?xml version="1.0" encoding="utf-8"?>
<androidx.constraintlayout.widget.ConstraintLayout xmlns:android="http://schemas.android.com/apk/res/android"
   xmlns:app="http://schemas.android.com/apk/res-auto"
   xmlns:tools="http://schemas.android.com/tools"
   android:layout_width="match_parent"
   android:layout_height="match_parent"
   tools:context=".MainActivity">

   <Button
       android:id="@+id/button1"
       android:layout_width="350dp"
       android:layout_height="60dp"
       android:layout_marginStart="32dp"
       android:layout_marginTop="5dp"
       android:layout_marginEnd="32dp"
       android:text="Effect 1"
       android:textSize="18sp"
       app:layout_constraintEnd_toEndOf="parent"
       app:layout_constraintStart_toStartOf="parent"
       app:layout_constraintTop_toTopOf="parent" />

   <Button
       android:id="@+id/button2"
       android:layout_width="350dp"
       android:layout_height="60dp"
       android:layout_marginStart="32dp"
       android:layout_marginTop="5dp"
       android:layout_marginEnd="32dp"
       android:text="Effect 2"
       android:textSize="18sp"
       app:layout_constraintEnd_toEndOf="parent"
       app:layout_constraintStart_toStartOf="parent"
       app:layout_constraintTop_toBottomOf="@+id/button1" />

   <Button
       android:id="@+id/button3"
       android:layout_width="350dp"
       android:layout_height="60dp"
       android:layout_marginStart="32dp"
       android:layout_marginTop="5dp"
       android:layout_marginEnd="32dp"
       android:text="Effect 3"
       android:textSize="18sp"
       app:layout_constraintEnd_toEndOf="parent"
       app:layout_constraintStart_toStartOf="parent"
       app:layout_constraintTop_toBottomOf="@+id/button2" />

   <View
       android:id="@+id/divider"
       android:layout_width="363dp"
       android:layout_height="1dp"
       android:layout_marginStart="32dp"
       android:layout_marginTop="10dp"
       android:layout_marginEnd="32dp"
       android:background="?android:attr/listDivider"
       app:layout_constraintEnd_toEndOf="parent"
       app:layout_constraintHorizontal_bias="0.5"
       app:layout_constraintStart_toStartOf="parent"
       app:layout_constraintTop_toBottomOf="@+id/button3" />

   <androidx.constraintlayout.widget.ConstraintLayout
       android:layout_width="363dp"
       android:layout_height="0dp"
       app:layout_constraintBottom_toBottomOf="parent"
       app:layout_constraintEnd_toEndOf="parent"
       app:layout_constraintHorizontal_bias="0.5"
       app:layout_constraintStart_toStartOf="parent"
       app:layout_constraintTop_toBottomOf="@+id/divider">

       <ImageView
           android:id="@+id/imageView"
           android:layout_width="wrap_content"
           android:layout_height="wrap_content"
           android:adjustViewBounds="true"
           android:scaleType="fitXY"
           app:layout_constraintBottom_toBottomOf="parent"
           app:layout_constraintEnd_toEndOf="parent"
           app:layout_constraintHorizontal_bias="0.5"
           app:layout_constraintStart_toStartOf="parent"
           app:layout_constraintTop_toTopOf="parent"
           app:srcCompat="@drawable/bluebar" />
   </androidx.constraintlayout.widget.ConstraintLayout>

</androidx.constraintlayout.widget.ConstraintLayout>
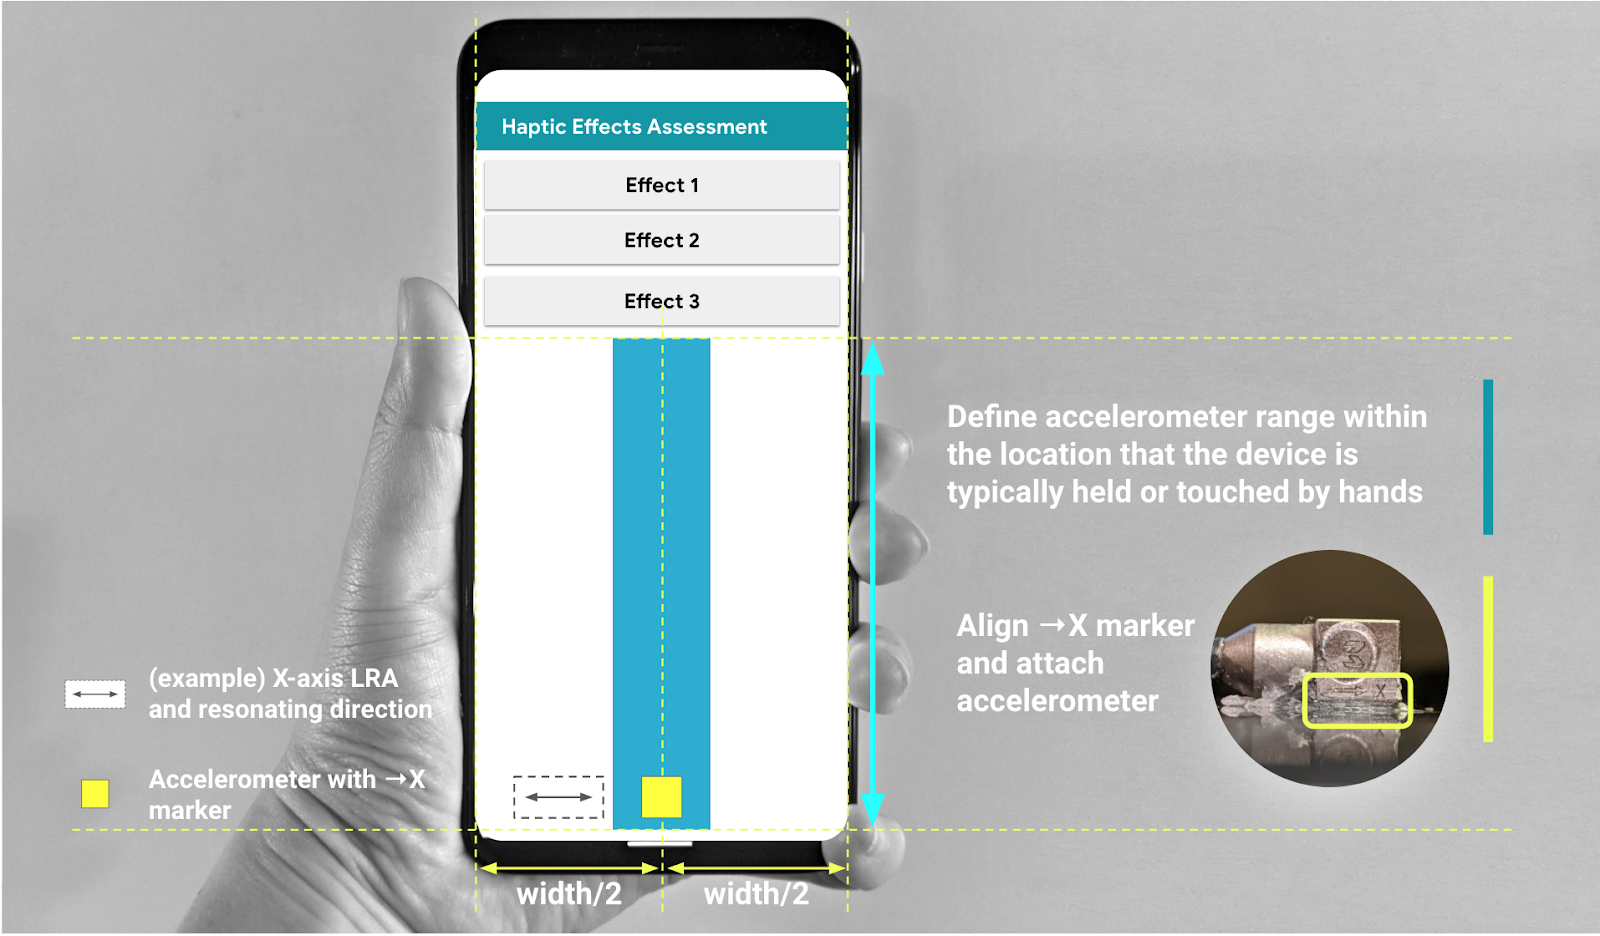
Şekil 3. Hız ölçeri, GUI'de önerilen alana takma