
L'évaluation du matériel utilise les logiciels suivants :
- Audacity (installé sur le PC)
- MATLAB (installé sur le PC)
- Application de test haptique (installée sur l'appareil testé)
Pour en savoir plus sur la configuration système requise, consultez Audacity pour Windows, Audacity pour Mac et MATLAB.
Configurer Audacity
Audacity doit être configuré pour recevoir des données de la carte son Sound Blaster à une certaine fréquence d'échantillonnage. Après avoir connecté la Sound Blaster au port USB de votre ordinateur, ouvrez Audacity et suivez ces instructions.
Sélectionnez Line (USB Sound Blaster HD) comme source d'entrée du micro en connectant physiquement la sortie CCLD au port d'entrée Line In de la carte Sound Blaster.

Figure 1. Sélectionner l'entrée micro
Définissez le taux d'échantillonnage sur 48 kHz en sélectionnant 48000 dans le menu Fréquence du projet.

Figure 2. Définir le taux d'échantillonnage
Télécharger MATLAB
Téléchargez le fichier MATLAB.
Extrayez le fichier et recherchez
Effect1NEffect2_V1p0_2020PM.m(pour l'effet 1 et l'effet 2) etEffect3_V1p0_2020PM.m(pour l'effet 3).
Configurer l'application de test sur le téléphone
Cette section explique comment configurer l'application de test sur le téléphone.
Préparer l'application de test
- Copiez le code source à partir des blocs de code Java et Kotlin ci-dessous. Choisissez celle qui vous convient le mieux.
- Écrivez votre propre code en suivant les paramètres de l'interface utilisateur graphique illustrés à la figure 3. Si nécessaire, ajustez les détails du code source de la mise en page pour qu'ils correspondent à votre téléphone.
Assurez-vous que votre interface utilisateur graphique inclut trois boutons cliquables et un indicateur visuel pour définir la zone où se trouve l'accéléromètre.
- La zone de localisation de l'accéléromètre représente la surface de l'écran de l'appareil qui est généralement touchée à la main.
- Pendant cette mesure, vous pouvez déplacer l'accéléromètre dans la zone turquoise pour trouver la zone de l'écran qui capte le signal le plus fort.
Installez le code sur l'appareil Android.
Il est fortement recommandé de définir le mode de navigation du système sur le mode gestuel si le mode par défaut est défini sur "Boutons".
- En définissant le mode geste, vous pouvez placer l'accéléromètre au bas du téléphone autant que possible sans être interrompu par les interfaces utilisateur graphiques de navigation système du téléphone.
Code source Java
package com.example.hapticeffectassessment;

import static android.os.VibrationEffect.EFFECT_CLICK;

import android.graphics.Color;
import android.os.Bundle;
import android.os.VibrationEffect;
import android.os.Vibrator;
import android.widget.Button;
import androidx.appcompat.app.AppCompatActivity;

public class MainActivity extends AppCompatActivity {

 private static final long oneShotTiming = 20;
 private static final int oneShotAmplitude = 255;

 private static final long[] waveformTimings = {500, 500};
 private static final int[] waveformAmplitudes = {128, 255};

 @Override
 protected void onCreate(Bundle savedInstanceState) {
   super.onCreate(savedInstanceState);
   setContentView(R.layout.activity_main);

   Vibrator vibrator = getSystemService(Vibrator.class);

   // Click R.id.button1 button to generate Effect 1
   findViewById(R.id.button1).setOnClickListener(
       view -> vibrator.vibrate(VibrationEffect.createPredefined(EFFECT_CLICK)));

   // Click R.id.button2 button to generate Effect 2
   findViewById(R.id.button2).setOnClickListener(
       view -> vibrator.vibrate(VibrationEffect.createOneShot(oneShotTiming, oneShotAmplitude)));

   // Click R.id.button3 button to generate Effect 3
   findViewById(R.id.button3).setOnClickListener(view -> {
     vibrator.vibrate(VibrationEffect.createWaveform(waveformTimings, waveformAmplitudes, -1));

     // See quick results of Effect 3
     Button button = (Button) view;
     if (vibrator.hasAmplitudeControl()) {
       button.setText("Effect 3: PASS");
       button.setBackgroundColor(Color.GREEN);
       button.setTextColor(Color.BLACK);
     } else {
       button.setText("Effect 3: FAIL");
       button.setBackgroundColor(Color.RED);
       button.setTextColor(Color.WHITE);
     }
   });
 }
}
Code source Kotlin
package com.example.hapticeffectassessment

import android.graphics.Color
import android.os.Bundle
import android.os.VibrationEffect
import android.os.VibrationEffect.EFFECT_CLICK
import android.os.Vibrator
import android.widget.Button
import androidx.appcompat.app.AppCompatActivity
import kotlinx.android.synthetic.main.activity_main.*

class MainActivityKt : AppCompatActivity() {

 private val oneShotTiming: Long = 20
 private val oneShotAmplitude = 255

 private val waveformTimings = longArrayOf(500, 500)
 private val waveformAmplitudes = intArrayOf(128, 255)

 override fun onCreate(savedInstanceState: Bundle?) {
   super.onCreate(savedInstanceState)
   setContentView(R.layout.activity_main)

   val vibrator = getSystemService(Vibrator::class.java)

   // Click button1 to generate Effect 1
   button1.setOnClickListener {
     vibrator.vibrate(VibrationEffect.createPredefined(EFFECT_CLICK))
   }

   // Click button2 to generate Effect 2
   button2.setOnClickListener {
     vibrator.vibrate(VibrationEffect.createOneShot(oneShotTiming, oneShotAmplitude))
   }

   // Click button3 to generate Effect 3
   button3.setOnClickListener {
     vibrator.vibrate(
       VibrationEffect.createWaveform(waveformTimings, waveformAmplitudes, -1))

     // See quick results of Effect 3
     if (vibrator.hasAmplitudeControl()) {
       button3.text = "Effect 3: PASS"
       button3.setBackgroundColor(Color.GREEN)
       button3.setTextColor(Color.BLACK)
     } else {
       button3.text = "Effect 3: FAIL"
       button3.setBackgroundColor(Color.RED)
       button3.setTextColor(Color.WHITE)
     }
   }
 }
}
Code source de la mise en page (activity_main.xml)
<?xml version="1.0" encoding="utf-8"?>
<androidx.constraintlayout.widget.ConstraintLayout xmlns:android="http://schemas.android.com/apk/res/android"
   xmlns:app="http://schemas.android.com/apk/res-auto"
   xmlns:tools="http://schemas.android.com/tools"
   android:layout_width="match_parent"
   android:layout_height="match_parent"
   tools:context=".MainActivity">

   <Button
       android:id="@+id/button1"
       android:layout_width="350dp"
       android:layout_height="60dp"
       android:layout_marginStart="32dp"
       android:layout_marginTop="5dp"
       android:layout_marginEnd="32dp"
       android:text="Effect 1"
       android:textSize="18sp"
       app:layout_constraintEnd_toEndOf="parent"
       app:layout_constraintStart_toStartOf="parent"
       app:layout_constraintTop_toTopOf="parent" />

   <Button
       android:id="@+id/button2"
       android:layout_width="350dp"
       android:layout_height="60dp"
       android:layout_marginStart="32dp"
       android:layout_marginTop="5dp"
       android:layout_marginEnd="32dp"
       android:text="Effect 2"
       android:textSize="18sp"
       app:layout_constraintEnd_toEndOf="parent"
       app:layout_constraintStart_toStartOf="parent"
       app:layout_constraintTop_toBottomOf="@+id/button1" />

   <Button
       android:id="@+id/button3"
       android:layout_width="350dp"
       android:layout_height="60dp"
       android:layout_marginStart="32dp"
       android:layout_marginTop="5dp"
       android:layout_marginEnd="32dp"
       android:text="Effect 3"
       android:textSize="18sp"
       app:layout_constraintEnd_toEndOf="parent"
       app:layout_constraintStart_toStartOf="parent"
       app:layout_constraintTop_toBottomOf="@+id/button2" />

   <View
       android:id="@+id/divider"
       android:layout_width="363dp"
       android:layout_height="1dp"
       android:layout_marginStart="32dp"
       android:layout_marginTop="10dp"
       android:layout_marginEnd="32dp"
       android:background="?android:attr/listDivider"
       app:layout_constraintEnd_toEndOf="parent"
       app:layout_constraintHorizontal_bias="0.5"
       app:layout_constraintStart_toStartOf="parent"
       app:layout_constraintTop_toBottomOf="@+id/button3" />

   <androidx.constraintlayout.widget.ConstraintLayout
       android:layout_width="363dp"
       android:layout_height="0dp"
       app:layout_constraintBottom_toBottomOf="parent"
       app:layout_constraintEnd_toEndOf="parent"
       app:layout_constraintHorizontal_bias="0.5"
       app:layout_constraintStart_toStartOf="parent"
       app:layout_constraintTop_toBottomOf="@+id/divider">

       <ImageView
           android:id="@+id/imageView"
           android:layout_width="wrap_content"
           android:layout_height="wrap_content"
           android:adjustViewBounds="true"
           android:scaleType="fitXY"
           app:layout_constraintBottom_toBottomOf="parent"
           app:layout_constraintEnd_toEndOf="parent"
           app:layout_constraintHorizontal_bias="0.5"
           app:layout_constraintStart_toStartOf="parent"
           app:layout_constraintTop_toTopOf="parent"
           app:srcCompat="@drawable/bluebar" />
   </androidx.constraintlayout.widget.ConstraintLayout>

</androidx.constraintlayout.widget.ConstraintLayout>
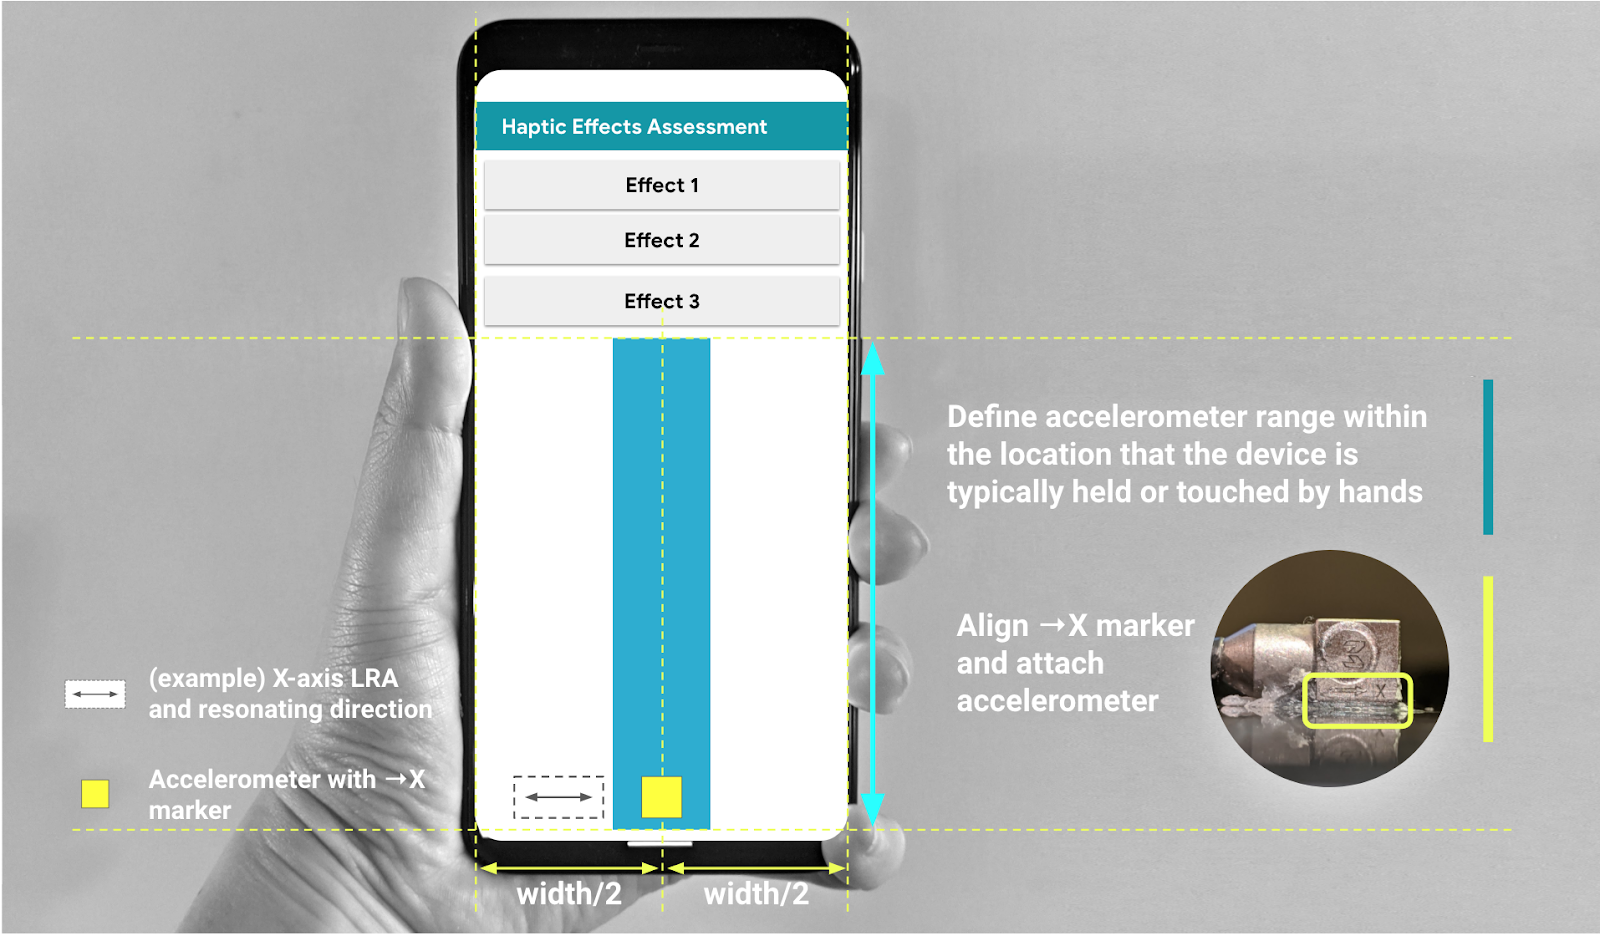
Figure 3. Fixer l'accéléromètre le long de la zone recommandée dans l'interface utilisateur graphique