
Quy trình đánh giá phần cứng sử dụng phần mềm sau:
- Audacity (được cài đặt trên máy tính)
- MATLAB (được cài đặt trên máy tính)
- Ứng dụng kiểm thử phản hồi xúc giác (được cài đặt trên DUT)
Để tìm hiểu thêm về các yêu cầu về hệ thống, hãy xem phần Audacity cho Windows, Audacity cho máy Mac và MATLAB.
Thiết lập Audacity
Bạn cần thiết lập Audacity để nhận dữ liệu đầu vào từ card âm thanh Sound Blaster ở một tốc độ lấy mẫu dữ liệu nhất định. Sau khi kết nối Sound Blaster với cổng USB trên máy tính, hãy mở Audacity và làm theo các hướng dẫn sau.
Chọn Line (USB Sound Blaster HD) làm nguồn micrô đầu vào bằng cách kết nối đầu ra CCLD với cổng đầu vào Line In của Sound Blaster.

Hình 1. Chọn đầu vào micrô
Đặt tốc độ lấy mẫu thành 48 kHz bằng cách chọn 48000 trong trình đơn Project Rate (Tốc độ dự án).

Hình 2. Đặt tốc độ lấy mẫu
Tải MATLAB xuống
Tải tệp MATLAB xuống.
Giải nén tệp và tìm
Effect1NEffect2_V1p0_2020PM.m(cho Effect1 và Effect 2) vàEffect3_V1p0_2020PM.m(cho Effect 3).
Thiết lập ứng dụng kiểm thử trên điện thoại
Phần này mô tả cách thiết lập ứng dụng kiểm thử trên điện thoại.
Chuẩn bị cho ứng dụng kiểm thử
- Sao chép mã nguồn từ các khối mã Java và Kotlin bên dưới. Chọn cách phù hợp nhất với bạn.
- Viết mã của riêng bạn theo các tham số GUI minh hoạ trong Hình 3. Điều chỉnh thông tin chi tiết về mã nguồn bố cục cho phù hợp với điện thoại của bạn nếu cần.
Đảm bảo rằng GUI của bạn có 3 nút có thể nhấp và một chỉ báo trực quan để xác định khu vực đặt gia tốc kế.
- Khu vực để xác định vị trí gia tốc kế thể hiện không gian thực của màn hình thiết bị mà người dùng thường chạm vào.
- Trong quá trình đo lường này, bạn có thể di chuyển gia tốc kế trong vùng màu xanh ngọc để tìm vùng trên màn hình thu được tín hiệu mạnh nhất.
Cài đặt mã trên thiết bị Android.
Bạn nên đặt chế độ thao tác trên hệ thống thành chế độ cử chỉ nếu chế độ mặc định được đặt là nút.
- Bằng cách đặt chế độ cử chỉ, bạn có thể đặt gia tốc kế ở dưới cùng của điện thoại nhiều nhất có thể mà không bị các GUI điều hướng hệ thống của điện thoại làm gián đoạn.
Mã nguồn Java
package com.example.hapticeffectassessment;

import static android.os.VibrationEffect.EFFECT_CLICK;

import android.graphics.Color;
import android.os.Bundle;
import android.os.VibrationEffect;
import android.os.Vibrator;
import android.widget.Button;
import androidx.appcompat.app.AppCompatActivity;

public class MainActivity extends AppCompatActivity {

 private static final long oneShotTiming = 20;
 private static final int oneShotAmplitude = 255;

 private static final long[] waveformTimings = {500, 500};
 private static final int[] waveformAmplitudes = {128, 255};

 @Override
 protected void onCreate(Bundle savedInstanceState) {
   super.onCreate(savedInstanceState);
   setContentView(R.layout.activity_main);

   Vibrator vibrator = getSystemService(Vibrator.class);

   // Click R.id.button1 button to generate Effect 1
   findViewById(R.id.button1).setOnClickListener(
       view -> vibrator.vibrate(VibrationEffect.createPredefined(EFFECT_CLICK)));

   // Click R.id.button2 button to generate Effect 2
   findViewById(R.id.button2).setOnClickListener(
       view -> vibrator.vibrate(VibrationEffect.createOneShot(oneShotTiming, oneShotAmplitude)));

   // Click R.id.button3 button to generate Effect 3
   findViewById(R.id.button3).setOnClickListener(view -> {
     vibrator.vibrate(VibrationEffect.createWaveform(waveformTimings, waveformAmplitudes, -1));

     // See quick results of Effect 3
     Button button = (Button) view;
     if (vibrator.hasAmplitudeControl()) {
       button.setText("Effect 3: PASS");
       button.setBackgroundColor(Color.GREEN);
       button.setTextColor(Color.BLACK);
     } else {
       button.setText("Effect 3: FAIL");
       button.setBackgroundColor(Color.RED);
       button.setTextColor(Color.WHITE);
     }
   });
 }
}
Mã nguồn Kotlin
package com.example.hapticeffectassessment

import android.graphics.Color
import android.os.Bundle
import android.os.VibrationEffect
import android.os.VibrationEffect.EFFECT_CLICK
import android.os.Vibrator
import android.widget.Button
import androidx.appcompat.app.AppCompatActivity
import kotlinx.android.synthetic.main.activity_main.*

class MainActivityKt : AppCompatActivity() {

 private val oneShotTiming: Long = 20
 private val oneShotAmplitude = 255

 private val waveformTimings = longArrayOf(500, 500)
 private val waveformAmplitudes = intArrayOf(128, 255)

 override fun onCreate(savedInstanceState: Bundle?) {
   super.onCreate(savedInstanceState)
   setContentView(R.layout.activity_main)

   val vibrator = getSystemService(Vibrator::class.java)

   // Click button1 to generate Effect 1
   button1.setOnClickListener {
     vibrator.vibrate(VibrationEffect.createPredefined(EFFECT_CLICK))
   }

   // Click button2 to generate Effect 2
   button2.setOnClickListener {
     vibrator.vibrate(VibrationEffect.createOneShot(oneShotTiming, oneShotAmplitude))
   }

   // Click button3 to generate Effect 3
   button3.setOnClickListener {
     vibrator.vibrate(
       VibrationEffect.createWaveform(waveformTimings, waveformAmplitudes, -1))

     // See quick results of Effect 3
     if (vibrator.hasAmplitudeControl()) {
       button3.text = "Effect 3: PASS"
       button3.setBackgroundColor(Color.GREEN)
       button3.setTextColor(Color.BLACK)
     } else {
       button3.text = "Effect 3: FAIL"
       button3.setBackgroundColor(Color.RED)
       button3.setTextColor(Color.WHITE)
     }
   }
 }
}
Mã nguồn bố cục (activity_main.xml)
<?xml version="1.0" encoding="utf-8"?>
<androidx.constraintlayout.widget.ConstraintLayout xmlns:android="http://schemas.android.com/apk/res/android"
   xmlns:app="http://schemas.android.com/apk/res-auto"
   xmlns:tools="http://schemas.android.com/tools"
   android:layout_width="match_parent"
   android:layout_height="match_parent"
   tools:context=".MainActivity">

   <Button
       android:id="@+id/button1"
       android:layout_width="350dp"
       android:layout_height="60dp"
       android:layout_marginStart="32dp"
       android:layout_marginTop="5dp"
       android:layout_marginEnd="32dp"
       android:text="Effect 1"
       android:textSize="18sp"
       app:layout_constraintEnd_toEndOf="parent"
       app:layout_constraintStart_toStartOf="parent"
       app:layout_constraintTop_toTopOf="parent" />

   <Button
       android:id="@+id/button2"
       android:layout_width="350dp"
       android:layout_height="60dp"
       android:layout_marginStart="32dp"
       android:layout_marginTop="5dp"
       android:layout_marginEnd="32dp"
       android:text="Effect 2"
       android:textSize="18sp"
       app:layout_constraintEnd_toEndOf="parent"
       app:layout_constraintStart_toStartOf="parent"
       app:layout_constraintTop_toBottomOf="@+id/button1" />

   <Button
       android:id="@+id/button3"
       android:layout_width="350dp"
       android:layout_height="60dp"
       android:layout_marginStart="32dp"
       android:layout_marginTop="5dp"
       android:layout_marginEnd="32dp"
       android:text="Effect 3"
       android:textSize="18sp"
       app:layout_constraintEnd_toEndOf="parent"
       app:layout_constraintStart_toStartOf="parent"
       app:layout_constraintTop_toBottomOf="@+id/button2" />

   <View
       android:id="@+id/divider"
       android:layout_width="363dp"
       android:layout_height="1dp"
       android:layout_marginStart="32dp"
       android:layout_marginTop="10dp"
       android:layout_marginEnd="32dp"
       android:background="?android:attr/listDivider"
       app:layout_constraintEnd_toEndOf="parent"
       app:layout_constraintHorizontal_bias="0.5"
       app:layout_constraintStart_toStartOf="parent"
       app:layout_constraintTop_toBottomOf="@+id/button3" />

   <androidx.constraintlayout.widget.ConstraintLayout
       android:layout_width="363dp"
       android:layout_height="0dp"
       app:layout_constraintBottom_toBottomOf="parent"
       app:layout_constraintEnd_toEndOf="parent"
       app:layout_constraintHorizontal_bias="0.5"
       app:layout_constraintStart_toStartOf="parent"
       app:layout_constraintTop_toBottomOf="@+id/divider">

       <ImageView
           android:id="@+id/imageView"
           android:layout_width="wrap_content"
           android:layout_height="wrap_content"
           android:adjustViewBounds="true"
           android:scaleType="fitXY"
           app:layout_constraintBottom_toBottomOf="parent"
           app:layout_constraintEnd_toEndOf="parent"
           app:layout_constraintHorizontal_bias="0.5"
           app:layout_constraintStart_toStartOf="parent"
           app:layout_constraintTop_toTopOf="parent"
           app:srcCompat="@drawable/bluebar" />
   </androidx.constraintlayout.widget.ConstraintLayout>

</androidx.constraintlayout.widget.ConstraintLayout>
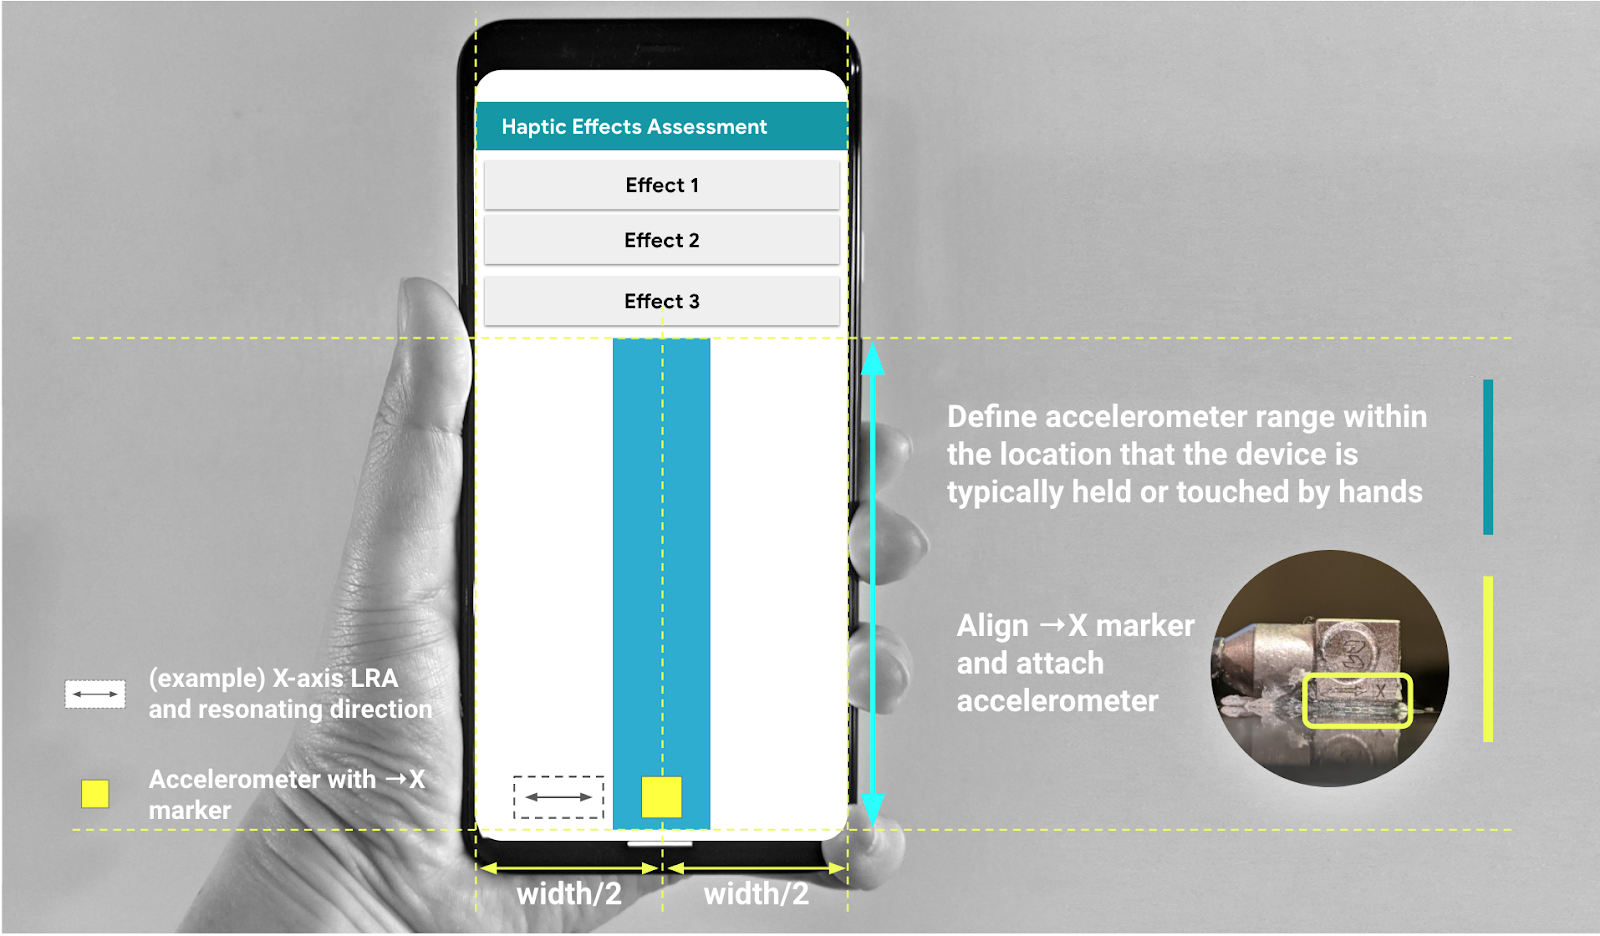
Hình 3. Gắn gia tốc kế dọc theo khu vực được đề xuất trong GUI