Kể từ ngày 27 tháng 3 năm 2025, bạn nên sử dụng android-latest-release thay vì aosp-main để xây dựng và đóng góp cho AOSP. Để biết thêm thông tin, hãy xem phần Thay đổi đối với AOSP.
Sử dụng bộ sưu tập để sắp xếp ngăn nắp các trang
Lưu và phân loại nội dung dựa trên lựa chọn ưu tiên của bạn.
Chạy Winscope cục bộ hoặc truy cập vào ứng dụng này từ máy chủ web.
Bạn có thể ghi lại dấu vết bằng Winscope để phát triển và gỡ lỗi cục bộ.
Winscope sử dụng adb, hỗ trợ kết nối thiết bị qua USB hoặc Wi-Fi.
Màn hình Collect Traces (Thu thập dấu vết) sẽ xuất hiện khi khởi chạy Winscope.
Kết nối thiết bị
Bạn có thể kết nối các thiết bị trong Winscope bằng cách sử dụng Winscope Proxy hoặc Web Device Proxy.
Theo mặc định, trang chủ Winscope sẽ hiển thị giao diện người dùng thiết lập kết nối Winscope Proxy.
Để bắt đầu ghi lại dấu vết, hãy chọn một trong các cơ chế kết nối thiết bị sau.
Thiết lập Winscope Proxy
Làm theo các bước sau để thiết lập Winscope Proxy:
Trong phần Collect Traces (Thu thập dấu vết) trên trang chủ, hãy chọn Winscope Proxy (Proxy Winscope) trong trình đơn thả xuống Select connection type (Chọn loại kết nối):
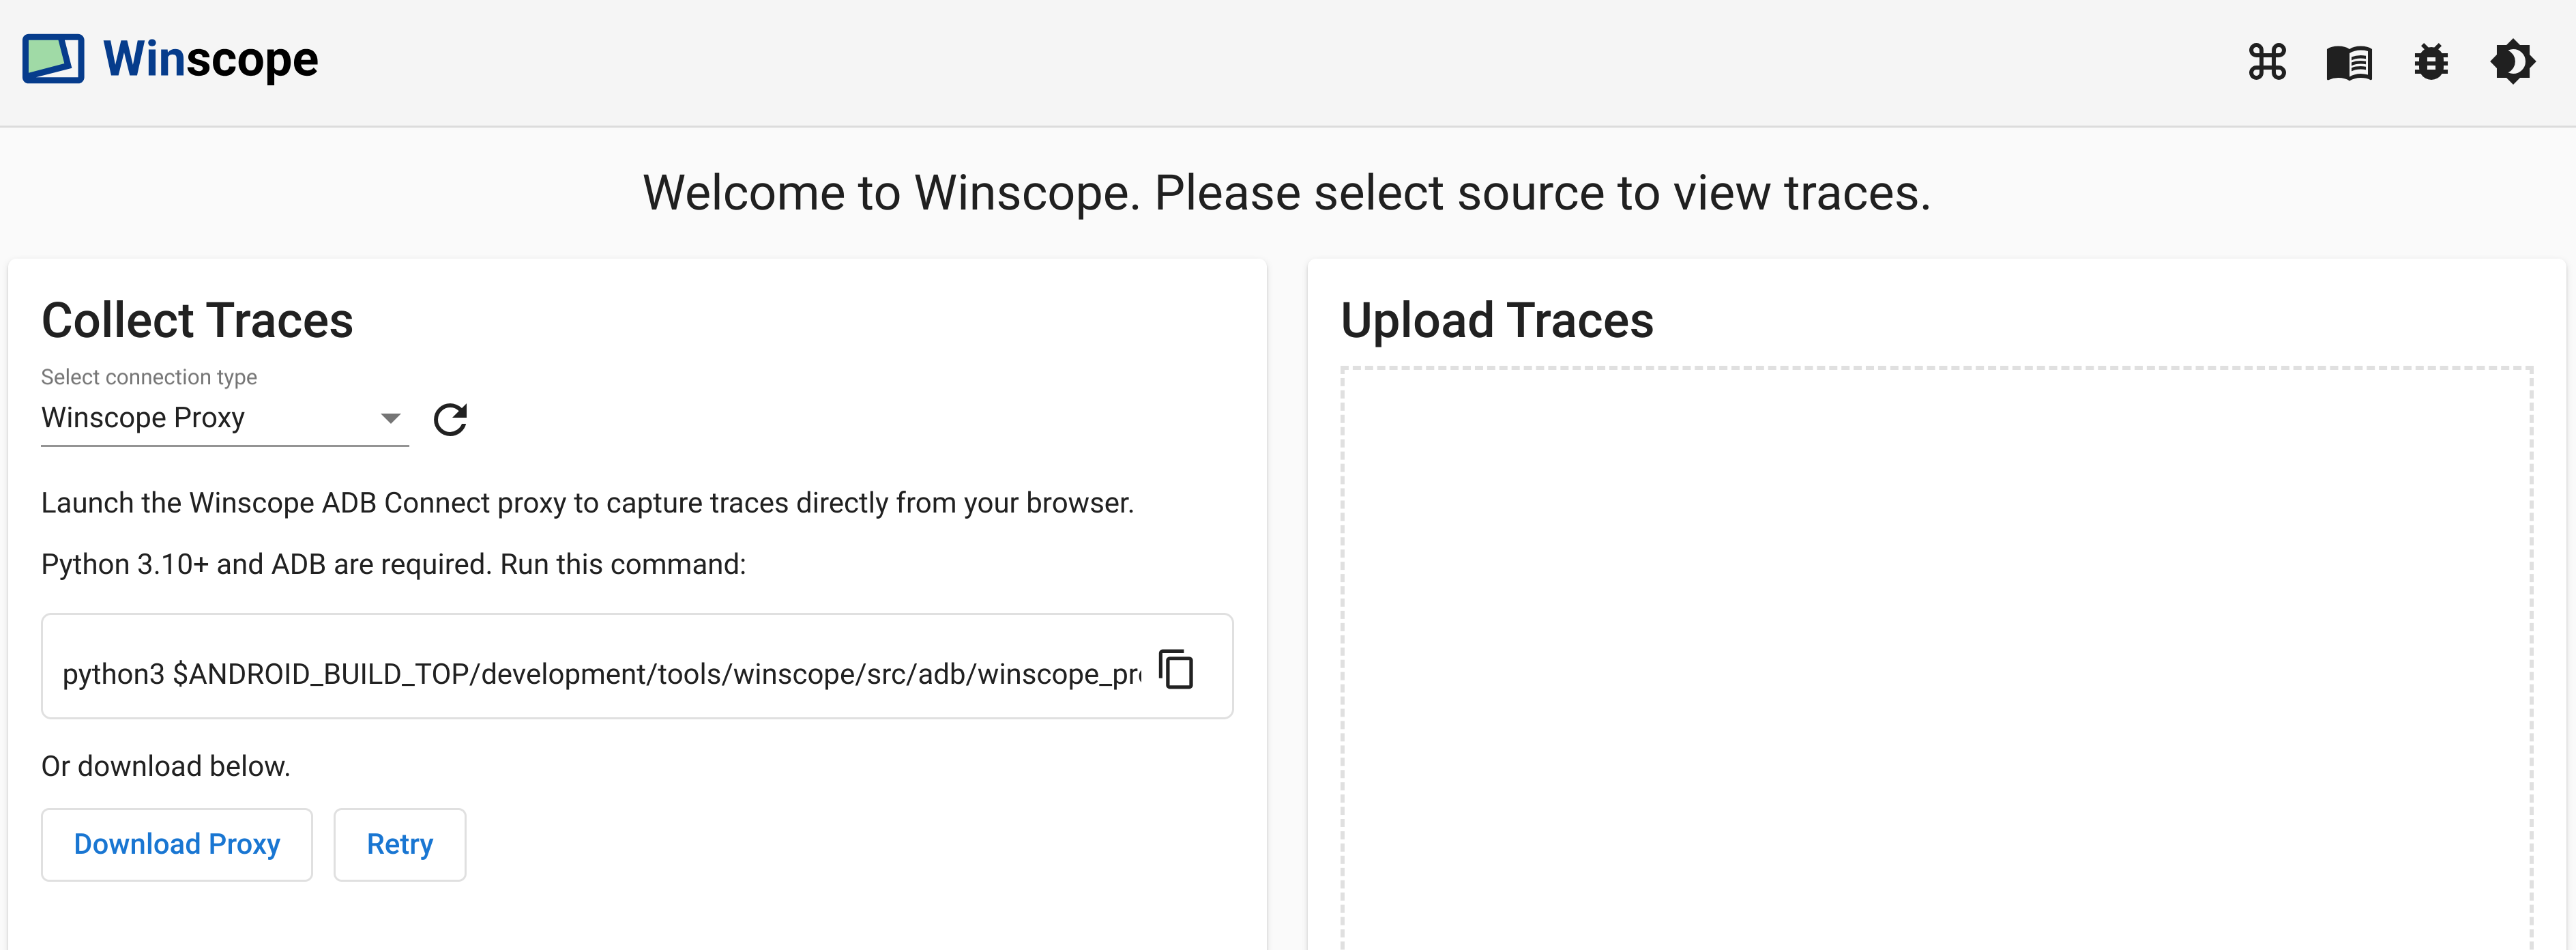
Hình 1. Ghi lại dấu vết bằng Winscope Proxy.
Chạy proxy Winscope ADB Connect để ghi lại dấu vết ngay từ trình duyệt bằng cách chạy lệnh sau:
Lưu ý mã thông báo proxy Winscope hiển thị trên thiết bị đầu cuối sau khi thực thi.
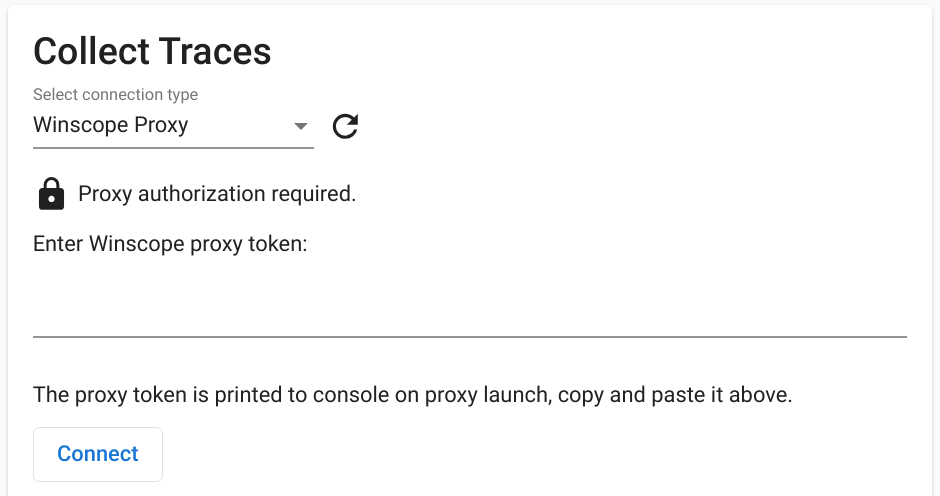
Sau khi bạn khởi chạy proxy Winscope ADB Connect, màn hình sẽ thay đổi như sau. Để thiết lập kết nối ban đầu với proxy, hãy nhập mã thông báo proxy Winscope từ bước 3 rồi nhấp vào Connect (Kết nối).
Hình 2. Kết nối với Winscope Proxy.
Thiết lập Web Device Proxy
Hãy làm theo các bước sau để thiết lập Proxy thiết bị web:
Trong phần Collect Traces (Thu thập dấu vết) trên trang chủ, hãy chọn Web Device Proxy (Proxy thiết bị web) trong trình đơn thả xuống Select connection type (Chọn loại kết nối):
Hình 3. Ghi lại dấu vết bằng Web Device Proxy.
Nếu bạn không có trình nền Proxy thiết bị web trên máy, hãy nhấp vào Install (Cài đặt) hoặc chạy trình cài đặt.
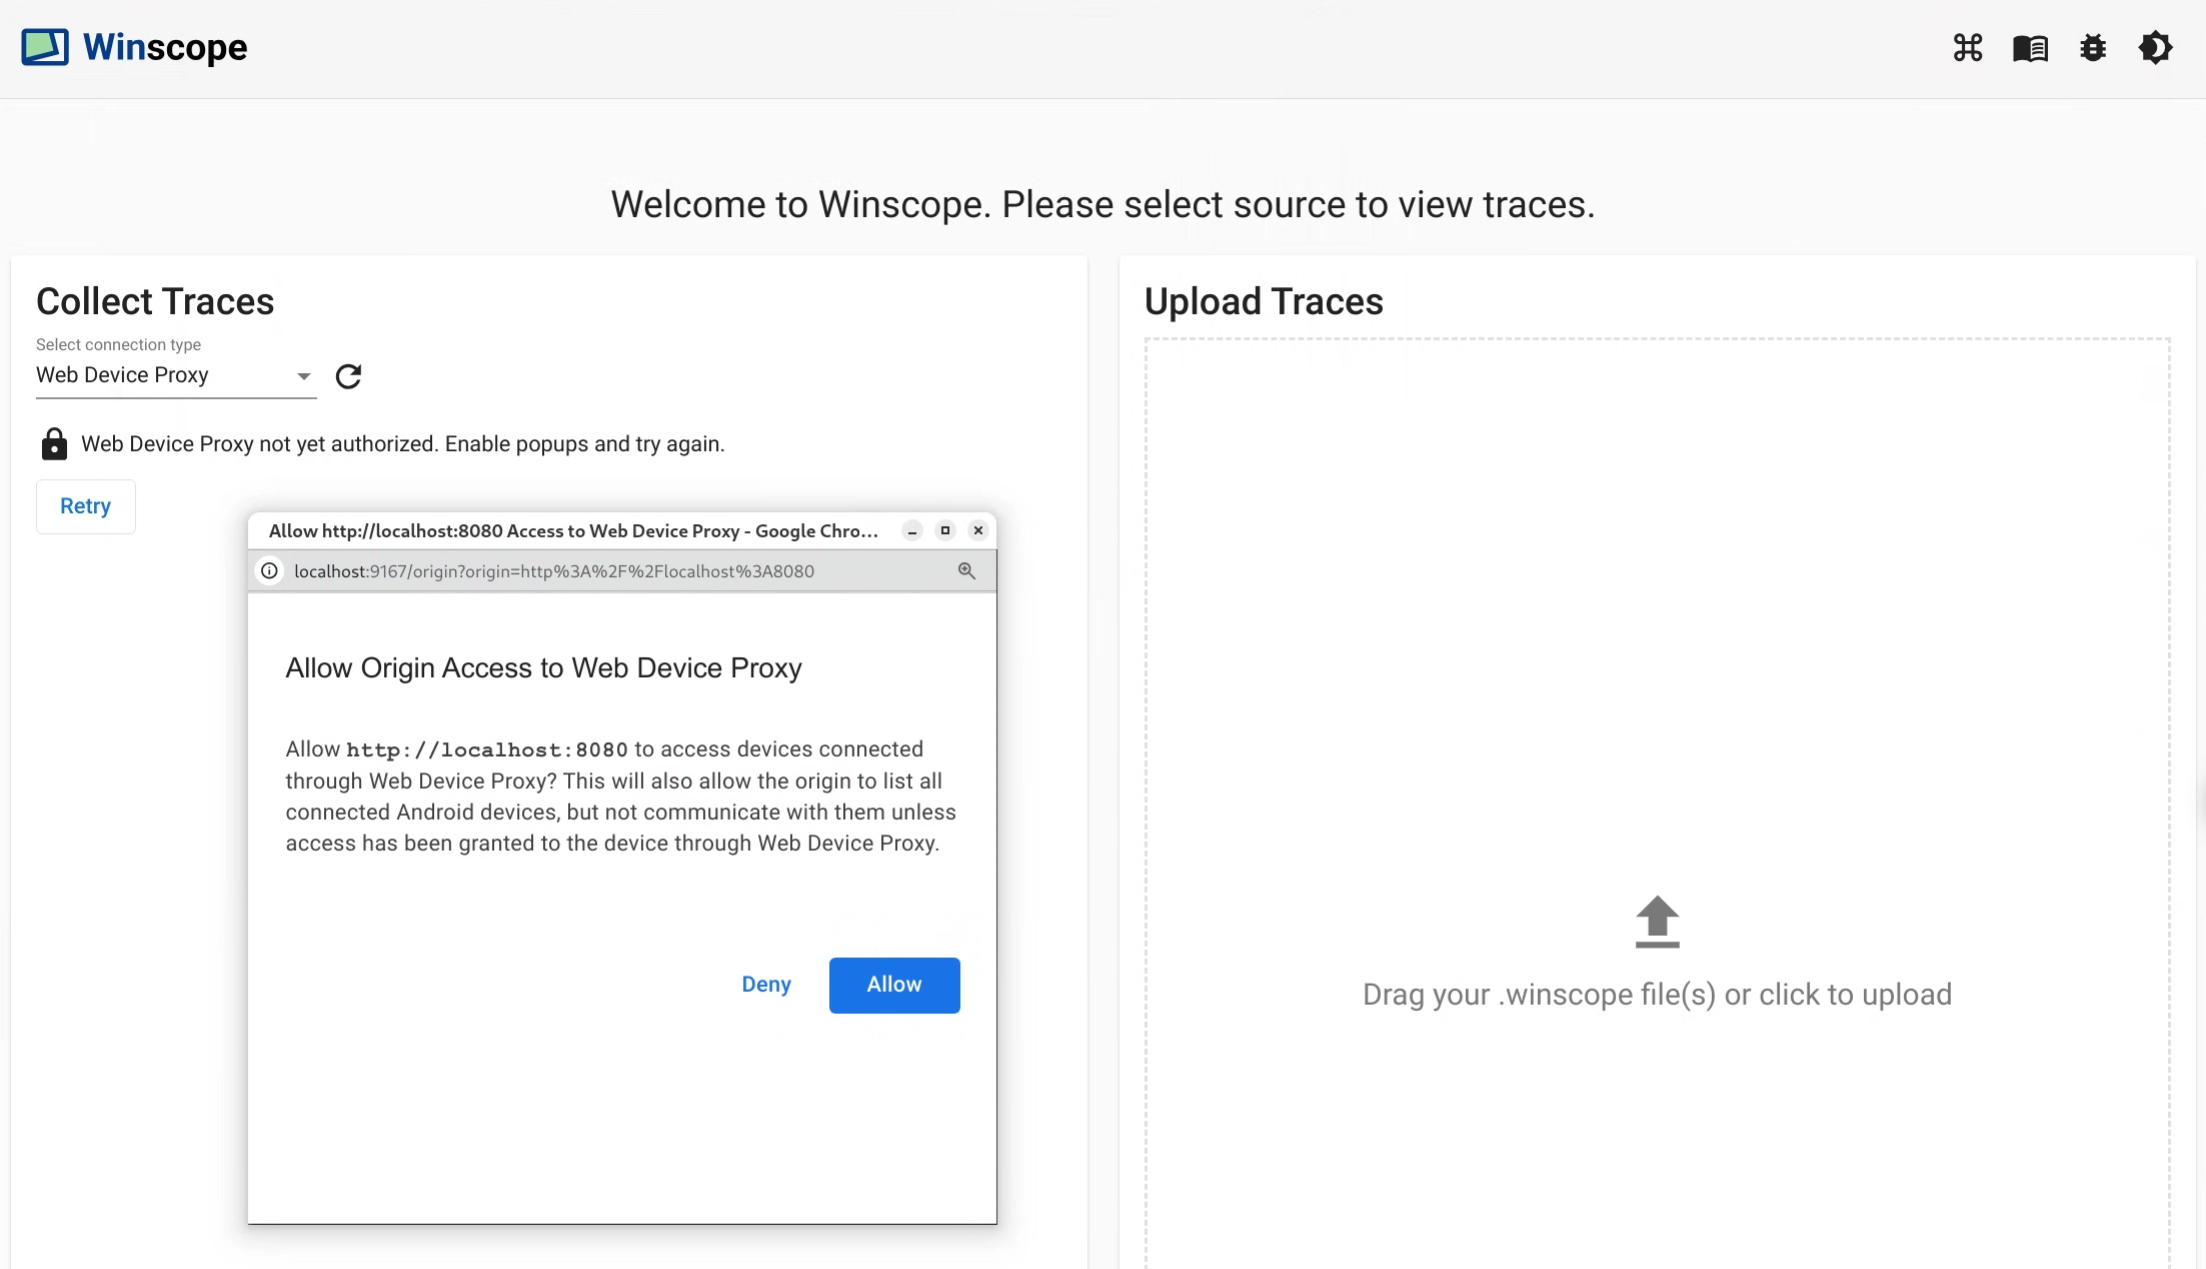
Phê duyệt quyền truy cập nguồn gốc vào Proxy thiết bị web thông qua hộp thoại.
Hình 4. Uỷ quyền nguồn gốc.
Phê duyệt quyền truy cập cho từng thiết bị mới trong lần đầu tiên bạn kết nối với thiết bị đó.
Nếu hộp thoại không tự động xuất hiện, hãy nhấp vào biểu tượng lock_open bên cạnh thiết bị:
Hình 5. Uỷ quyền thiết bị.
Dấu vết
Hãy làm theo các bước sau để thu thập dấu vết:
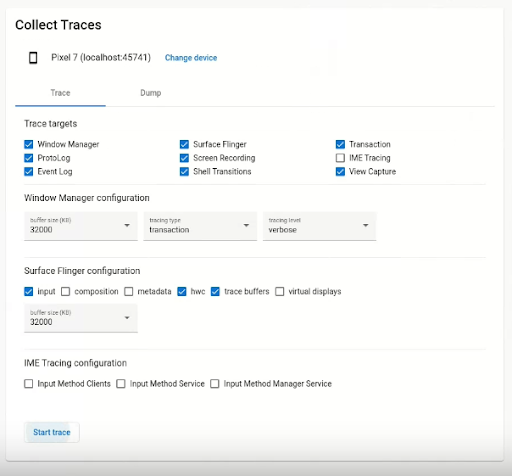
Khi đã kết nối, để bắt đầu quá trình chụp, hãy chọn các mục tiêu và định cấu hình chế độ cài đặt. Sau đó, hãy nhấp vào Start trace (Bắt đầu theo dõi) để bắt đầu ghi:
Hình 6. Thu thập dấu vết trong Winscope.
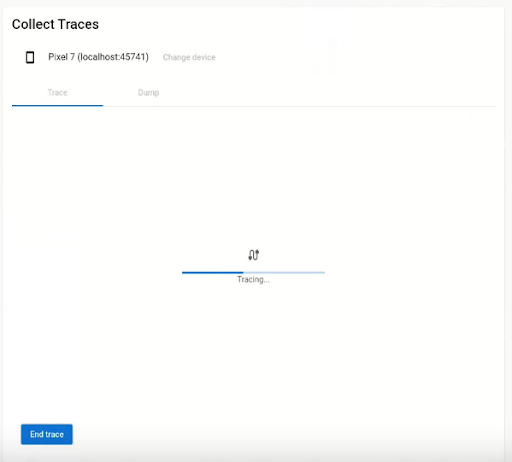
Để dừng quá trình ghi, hãy nhấp vào End trace (Kết thúc theo dõi):
Hình 7. Kết thúc dấu vết trong Winscope.
Tuỳ chọn theo dõi
Phần này mô tả các tuỳ chọn cho từng loại dấu vết.
Ghi màn hình
Với Winscope, bạn có thể quay màn hình của nhiều màn hình. Chọn một màn hình trong trình đơn để ghi màn hình. Nếu bạn không chọn, theo mặc định, Winscope sẽ ghi lại màn hình đang hoạt động.
SurfaceFlinger
Kích thước vùng đệm: Điều chỉnh kích thước vùng đệm vòng trong bộ nhớ cho dấu vết SurfaceFlinger. Vùng đệm lớn hơn cho phép thu thập nhiều dữ liệu hơn nhưng làm tăng mức sử dụng bộ nhớ.
Dữ liệu đầu vào: Nếu giao diện chứa dữ liệu đầu vào, hãy theo dõi thông tin cụ thể của cửa sổ đầu vào.
Cấu trúc: Theo dõi loại cấu trúc và vùng hiển thị.
Siêu dữ liệu: Theo dõi siêu dữ liệu bổ sung của giao diện, bao gồm cả các lớp ngoài màn hình.
HWC: Theo dõi siêu dữ liệu bổ sung của trình tổng hợp phần cứng không có cấu trúc.
Vùng đệm theo dõi: Định cấu hình SurfaceFlinger để theo dõi tất cả các thay đổi về vùng đệm trên bề mặt. Theo mặc định, SurfaceFlinger chỉ theo dõi trạng thái mới khi hình học bị thay đổi.
Màn hình ảo: Bao gồm các lớp màn hình ảo trong dấu vết.
WindowManager
Dung lượng bộ nhớ đệm: Điều chỉnh kích thước của vùng đệm vòng trong bộ nhớ cho dấu vết WindowManager. Vùng đệm lớn hơn cho phép thu thập nhiều dữ liệu hơn nhưng làm tăng mức sử dụng bộ nhớ.
Loại theo dõi: Xác định các tuỳ chọn tần suất để thu thập trạng thái:
khung: Ở chế độ này, WindowManager sẽ kết xuất một trạng thái duy nhất cho mỗi khung, đảm bảo rằng chỉ các trạng thái WindowManager hợp lệ mới được ghi lại. Chế độ này có mức hao tổn hiệu suất thấp nhất.
giao dịch: Chế độ này ghi lại trạng thái WindowManager mỗi khi một giao dịch được thực hiện. Bạn có thể thực hiện nhiều giao dịch trong một khung, nhờ đó có thể gỡ lỗi các trạng thái WindowManager trung gian trong một khung. Tuy nhiên, chế độ này có mức hao tổn hiệu suất cao hơn so với chế độ khung.
Cấp độ theo dõi: Xác định mức độ chi tiết của dấu vết WindowManager:
verbose: Bao gồm tất cả cửa sổ và thông tin cấu hình cho từng cửa sổ. Chế độ này có mức hao tổn bộ nhớ và hiệu suất cao nhất.
debug: Bao gồm thông tin về tất cả các cửa sổ, nhưng chỉ ghi lại cấu hình cửa sổ nếu cấu hình đó chứa cấu hình ghi đè được yêu cầu.
critical (quan trọng): Cung cấp thông tin giống như Chế độ gỡ lỗi, nhưng chỉ bao gồm các cửa sổ hiển thị. Chế độ này có mức hao tổn bộ nhớ và hiệu suất nhỏ nhất.
Tệp kết xuất
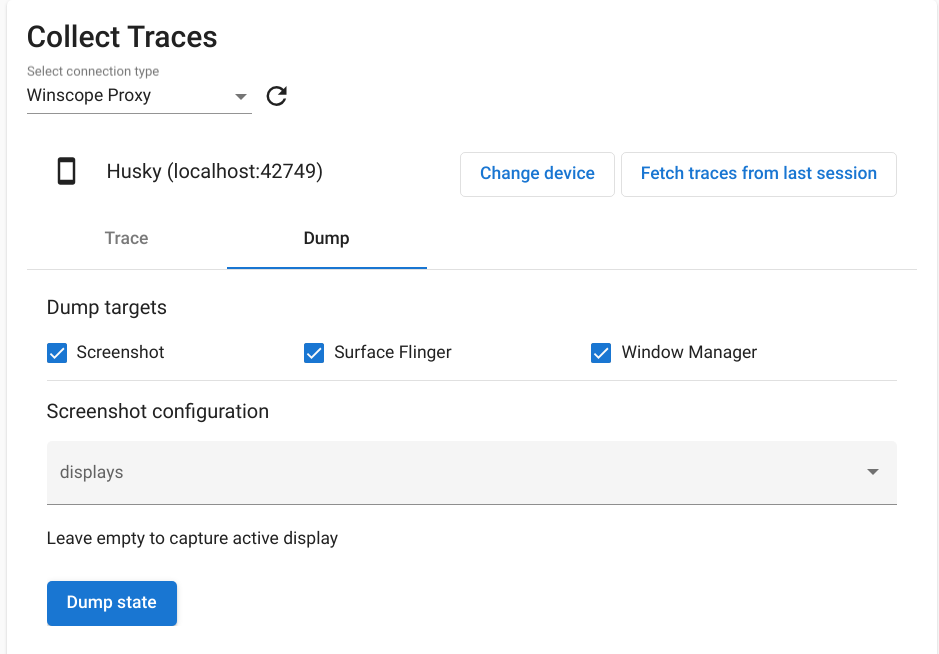
Để tạo tệp báo lỗi bằng Winscope, trong phần Collect Traces (Thu thập dấu vết) trên trang chủ, hãy chọn thẻ Dump (Tệp báo lỗi) rồi nhấp vào Dump state (Tạo tệp báo lỗi):
Hình 8. Trạng thái kết xuất trong Winscope.
Cấu hình ảnh chụp màn hình
Winscope cho phép chụp ảnh màn hình cho nhiều màn hình. Chọn một màn hình trong trình đơn để chụp ảnh màn hình. Nếu bạn không chọn màn hình nào, hệ thống sẽ thu thập ảnh chụp màn hình cho màn hình đang hoạt động.
Nội dung và mã mẫu trên trang này phải tuân thủ các giấy phép như mô tả trong phần Giấy phép nội dung. Java và OpenJDK là nhãn hiệu hoặc nhãn hiệu đã đăng ký của Oracle và/hoặc đơn vị liên kết của Oracle.
Cập nhật lần gần đây nhất: 2025-07-27 UTC.
[[["Dễ hiểu","easyToUnderstand","thumb-up"],["Giúp tôi giải quyết được vấn đề","solvedMyProblem","thumb-up"],["Khác","otherUp","thumb-up"]],[["Thiếu thông tin tôi cần","missingTheInformationINeed","thumb-down"],["Quá phức tạp/quá nhiều bước","tooComplicatedTooManySteps","thumb-down"],["Đã lỗi thời","outOfDate","thumb-down"],["Vấn đề về bản dịch","translationIssue","thumb-down"],["Vấn đề về mẫu/mã","samplesCodeIssue","thumb-down"],["Khác","otherDown","thumb-down"]],["Cập nhật lần gần đây nhất: 2025-07-27 UTC."],[],[],null,["# Capture traces with Winscope\n\n[Run Winscope](/docs/core/graphics/winscope/run) locally or access it\nfrom a web server.\n\nYou can capture traces using Winscope for local development and debugging.\nWinscope uses [adb](https://developer.android.com/tools/adb), which supports\ndevice connection over USB or Wi-Fi.\n\nThe **Collect Traces** screen is displayed on launching Winscope.\n\nDevice connection\n-----------------\n\nYou can connect devices in Winscope using\n[Winscope Proxy](#winscope-proxy-setup)\nor\n[Web Device Proxy](#web-device-proxy-setup).\nBy default, the Winscope homepage shows the **Winscope Proxy** connection setup\nUI.\n\nTo start capturing traces, choose one of the following device connection\nmechanisms.\n\n### Winscope Proxy setup\n\nFollow these steps to set up Winscope Proxy:\n\n1. Under **Collect Traces** on the homepage, choose **Winscope Proxy** in the\n **Select connection type** drop-down:\n\n **Figure 1.** Capture traces using Winscope Proxy.\n2. Launch the Winscope ADB Connect proxy to capture traces directly from your\n browser, by running the following command:\n\n python3 $ANDROID_BUILD_TOP/development/tools/winscope/src/adb/winscope_proxy.py\n\n | **Note:** Python 3.10+ and adb are required.\n3. Note the Winscope proxy token displayed on the terminal after execution.\n\n4. After you launch the Winscope ADB Connect proxy, the screen changes as\n follows. To establish the initial connection to the proxy, input the\n Winscope proxy token from step 3 and click **Connect**.\n\n **Figure 2.** Connect to Winscope Proxy.\n\n### Web Device Proxy setup\n\nFollow these steps to set up Web Device Proxy:\n\n1. Under **Collect Traces** on the homepage, choose **Web Device Proxy** in the\n **Select connection type** drop-down:\n\n **Figure 3.** Capture traces using Web Device Proxy.\n2. If you don't have the Web Device Proxy daemon on your machine, click\n **Install** or run the\n [installer](https://tools.google.com/dlpage/android_web_device_proxy).\n\n | **Note:** Web Device Proxy is not yet supported on Mac.\n3. Approve origin access to Web Device Proxy through the dialog.\n\n **Figure 4.** Authorize origin.\n4. Approve access for each new device the first time you connect to the device.\n If the dialog does not automatically appear, click the `lock_open` icon next\n to the device:\n\n **Figure 5.** Authorize device.\n\nTraces\n------\n\nFollow these steps to collect traces:\n\n1. When connected, to initiate the capture process, select the targets and\n configure the settings. Then click **Start trace** to begin the capture:\n\n **Figure 6.** Collect traces in Winscope.\n2. To stop the capture, click **End trace**:\n\n **Figure 7.** End trace in Winscope.\n\nTrace options\n-------------\n\nThis section describes the options for each trace type.\n\n### Screen recording\n\nWith Winscope, you can record the screen of multiple displays. Choose a display\nfrom the menu to screen record. If you don't make a selection, Winscope records\nthe active display by default.\n| **Note:** Multi-display selection is available only with adb `screenrecord` v1.4 and higher, that is builds from September 2024 on. Single display selection is available for any version earlier than that.\n\n### SurfaceFlinger\n\n- **Buffer size:** Adjusts the size of the in-memory ring buffer for the\n SurfaceFlinger trace. A larger buffer enables the collection of more data\n but increases memory usage.\n\n | **Note:** Buffer size is deprecated starting in Android 15.\n- **Input:** If the surface contains input data, tracks the specifics of\n the input window.\n\n- **Composition:** Traces the composition type and visible region.\n\n- **Metadata:** Traces additional surface metadata, including offscreen\n layers.\n\n | **Warning:** Metadata is highly verbose and requires a large amount of memory.\n- **HWC:** Traces additional unstructured hardware composer metadata.\n\n | **Warning:** HWC is highly verbose and requires a large amount of memory.\n- **Trace buffers:** Configures SurfaceFlinger to trace all buffer changes on\n the surface. By default, SurfaceFlinger traces a new state only when the\n geometry is altered.\n\n- **Virtual displays:** Includes virtual display layers in the trace.\n\n### WindowManager\n\n- **Buffer size:** Adjusts the size of the in-memory ring buffer for the WindowManager trace. A larger buffer enables the collection of more data but increases memory usage.\n- **Tracing type:** Defines the frequency options for collecting states:\n\n - *frame:* In this mode, the WindowManager dumps a single state per frame, ensuring that only valid WindowManager states are captured. This mode has the lowest performance overhead.\n - *transaction:* This mode records a WindowManager state whenever a transaction is committed. You can commit multiple transactions within a frame, so this allows for debugging intermediate WindowManager states during a frame. However, this mode has a higher performance overhead compared to the frame mode.\n- **Tracing level:** Determines the verbosity of the WindowManager traces:\n\n - *verbose:* Includes all windows and configuration information for each window. This mode has the highest memory and performance overhead.\n - *debug:* Includes information about all windows, but logs only the window configuration if it contains a requested override configuration.\n - *critical:* Includes the same information as Debug mode, but includes only visible windows. This mode has the smallest memory and performance overhead.\n\nDumps\n-----\n\nTo take a state dump using Winscope, under **Collect Traces** on the homepage\nselect the **Dump** tab and then click **Dump state**:\n\n**Figure 8.** Dump state in Winscope.\n\n### Screenshot configuration\n\nWinscope allows taking a screenshot for multiple displays. Choose a display from\nthe menu to screenshot. If no selection is made, a screenshot is collected for\nthe active display."]]