از 27 مارس 2025، توصیه می کنیم از android-latest-release به جای aosp-main برای ساختن و کمک به AOSP استفاده کنید. برای اطلاعات بیشتر، به تغییرات AOSP مراجعه کنید.
میتوانید با استفاده از Winscope برای توسعه محلی و اشکالزدایی، ردیابیها را ثبت کنید. Winscope از adb استفاده می کند که از اتصال دستگاه از طریق USB یا Wi-Fi پشتیبانی می کند.
صفحه جمع آوری ردیابی هنگام راه اندازی Winscope نمایش داده می شود.
اتصال دستگاه
میتوانید دستگاهها را در Winscope با استفاده از Winscope Proxy یا Web Device Proxy متصل کنید. بهطور پیشفرض، صفحه اصلی Winscope رابط تنظیمات اتصال Winscope Proxy را نشان میدهد.
برای شروع ثبت ردیابی، یکی از مکانیسم های اتصال دستگاه زیر را انتخاب کنید.
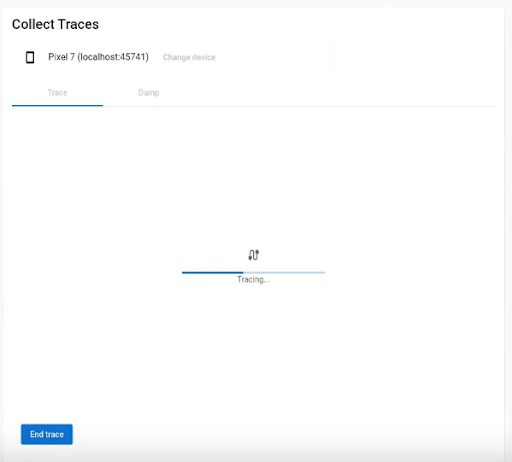
راه اندازی پروکسی Winscope
برای راه اندازی Winscope Proxy مراحل زیر را دنبال کنید:
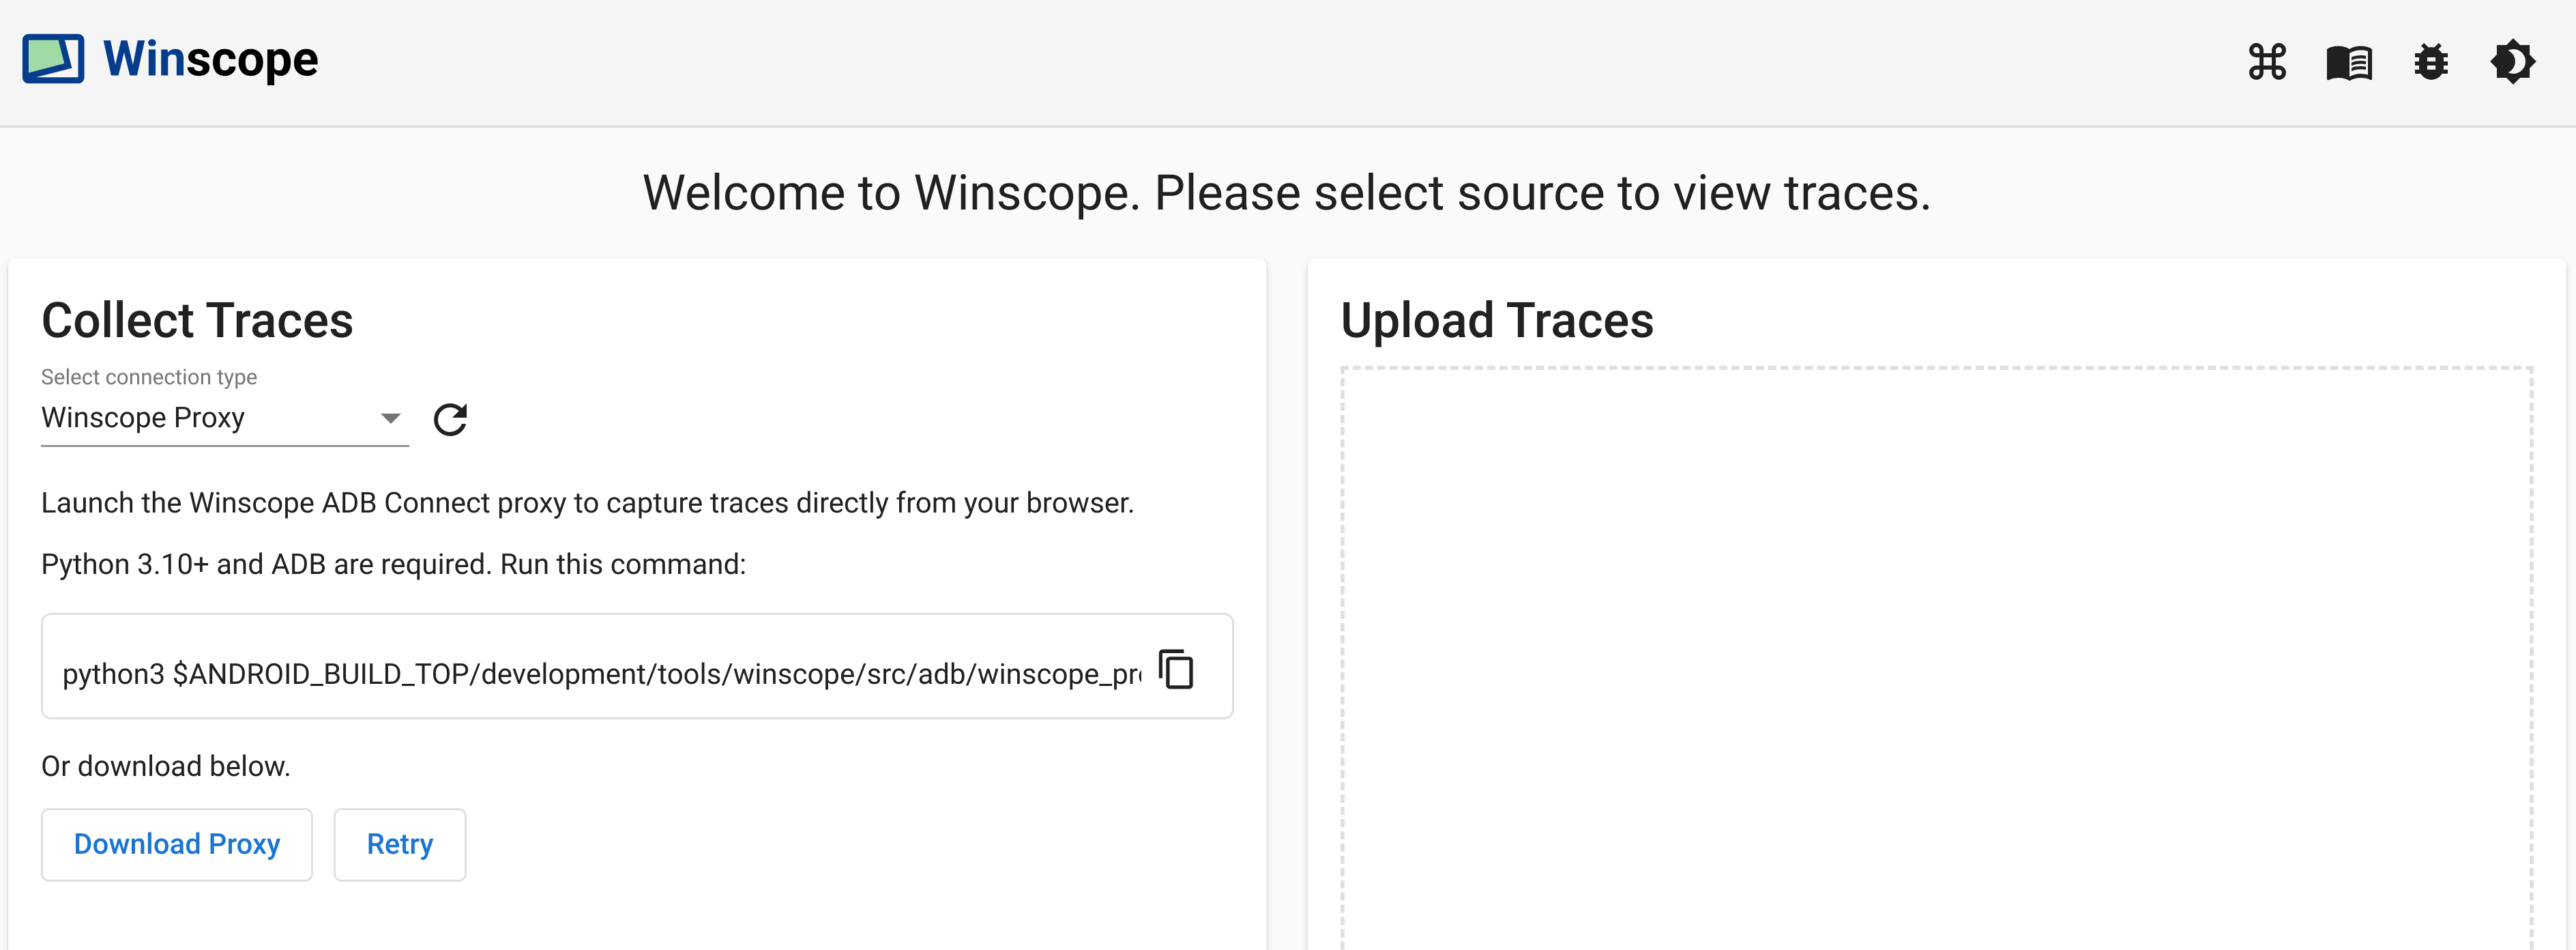
در قسمت Collect Traces در صفحه اصلی، Winscope Proxy را در منوی انتخاب نوع اتصال انتخاب کنید:
شکل 1. ردیابی با استفاده از Winscope Proxy.
با اجرای دستور زیر، پروکسی Winscope ADB Connect را برای ثبت ردیابی مستقیم از مرورگر خود راه اندازی کنید:
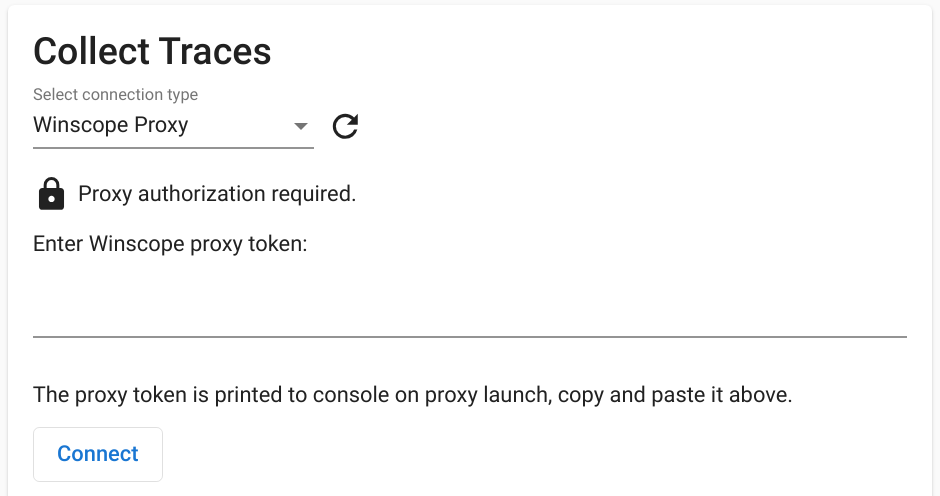
به توکن پراکسی Winscope که پس از اجرا در ترمینال نمایش داده می شود توجه کنید.
پس از راه اندازی پراکسی Winscope ADB Connect، صفحه به صورت زیر تغییر می کند. برای برقراری ارتباط اولیه با پراکسی، رمز پراکسی Winscope را از مرحله 3 وارد کرده و روی Connect کلیک کنید.
شکل 2. به Winscope Proxy متصل شوید.
راه اندازی پروکسی دستگاه وب
این مراحل را برای راه اندازی Web Device Proxy دنبال کنید:
در قسمت Collect Traces در صفحه اصلی، Web Device Proxy را در منوی انتخاب نوع اتصال انتخاب کنید:
شکل 3. با استفاده از Web Device Proxy از ردیابی ها عکس بگیرید.
اگر دیمون Web Device Proxy را در دستگاه خود ندارید، روی Install کلیک کنید یا نصب کننده را اجرا کنید.
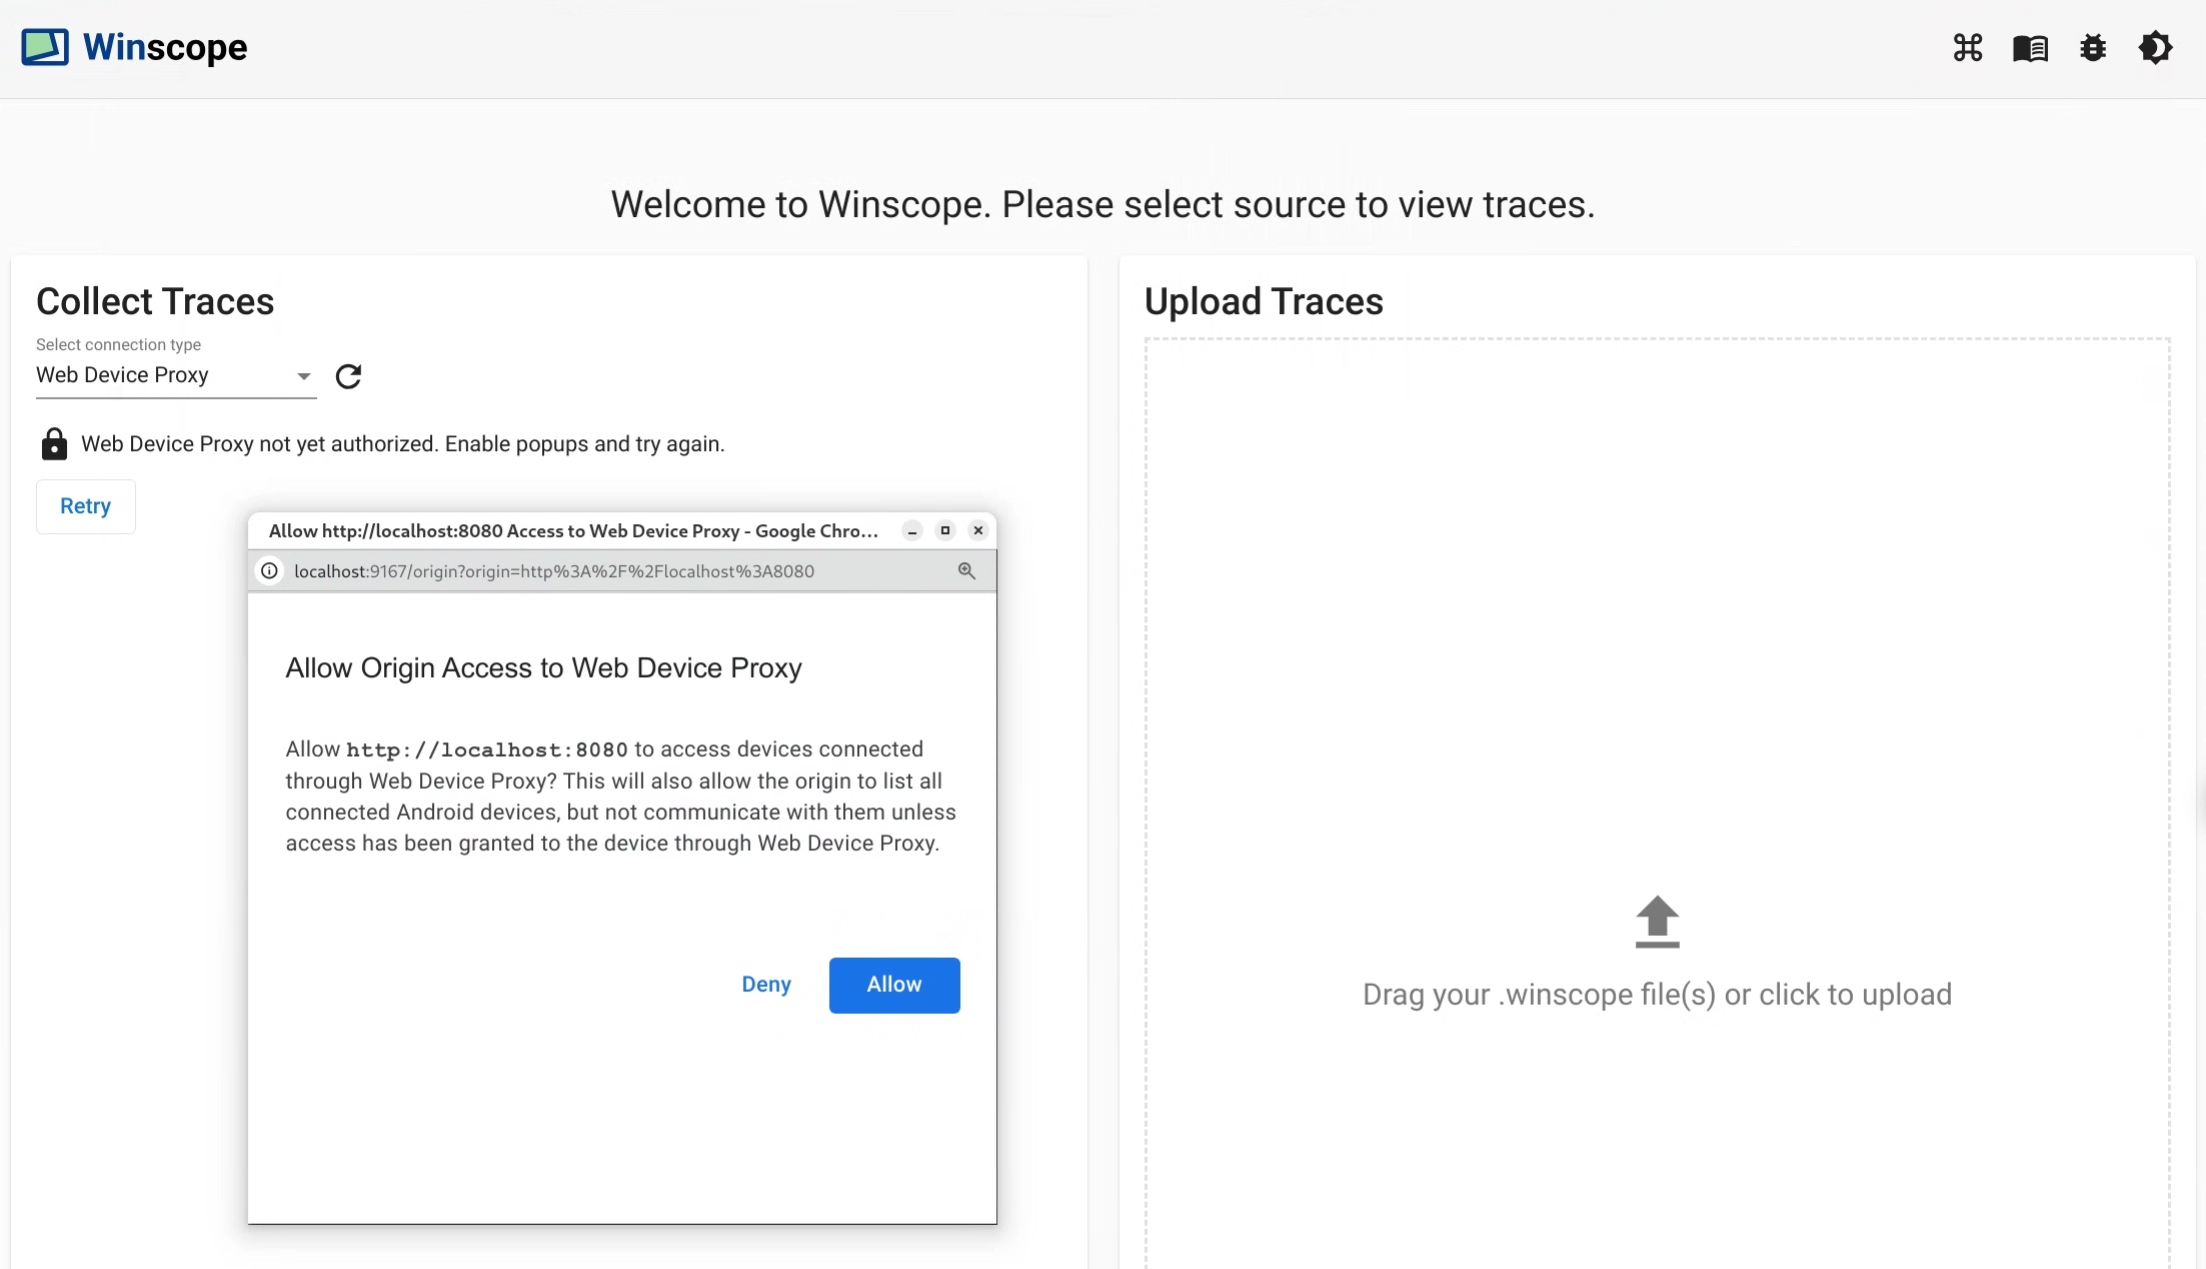
دسترسی مبدأ به پروکسی دستگاه وب را از طریق گفتگو تأیید کنید.
شکل 4. مجوز مبدا.
برای اولین بار که به دستگاه متصل می شوید، دسترسی هر دستگاه جدید را تأیید کنید. اگر گفتگو به طور خودکار ظاهر نشد، روی نماد lock_open در کنار دستگاه کلیک کنید:
شکل 5. مجوز دستگاه.
آثار
برای جمع آوری ردیابی مراحل زیر را دنبال کنید:
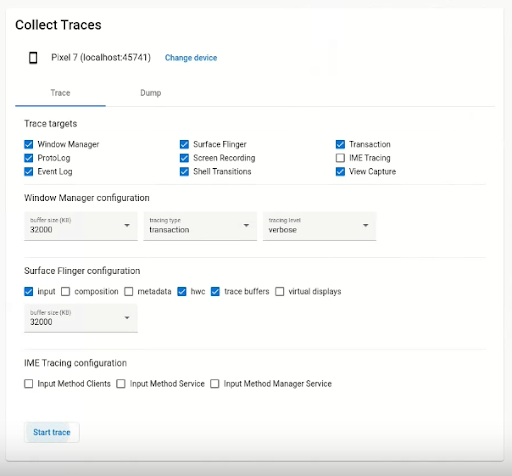
هنگام اتصال، برای شروع فرآیند ضبط، اهداف را انتخاب کرده و تنظیمات را پیکربندی کنید. سپس روی Start trace کلیک کنید تا ضبط شروع شود:
شکل 6. ردیابی را در Winscope جمع آوری کنید.
برای توقف ضبط، روی پایان ردیابی کلیک کنید:
شکل 7. پایان ردیابی در وینسکوپ.
گزینه های ردیابی
این بخش گزینه های هر نوع ردیابی را توضیح می دهد.
ضبط صفحه نمایش
با Winscope می توانید صفحه نمایش چندین نمایشگر را ضبط کنید. برای ضبط صفحه نمایشی را از منو انتخاب کنید. اگر انتخابی انجام ندهید، Winscope نمایش فعال را به طور پیش فرض ضبط می کند.
سرفیس فلینگر
اندازه بافر: اندازه بافر حلقه درون حافظه را برای ردیابی SurfaceFlinger تنظیم می کند. یک بافر بزرگتر امکان جمع آوری داده های بیشتری را فراهم می کند اما استفاده از حافظه را افزایش می دهد.
ورودی: اگر سطح دارای داده های ورودی باشد، مشخصات پنجره ورودی را ردیابی می کند.
ترکیب: نوع ترکیب و ناحیه قابل مشاهده را ردیابی می کند.
فراداده: فراداده های سطحی اضافی، از جمله لایه های خارج از صفحه را ردیابی می کند.
HWC: فراداده های اضافی سازنده سخت افزار بدون ساختار را ردیابی می کند.
بافرهای ردیابی: SurfaceFlinger را برای ردیابی تمام تغییرات بافر روی سطح پیکربندی می کند. بهطور پیشفرض، SurfaceFlinger یک حالت جدید را تنها زمانی دنبال میکند که هندسه تغییر کند.
نمایشهای مجازی: شامل لایههای نمایش مجازی در ردیابی است.
WindowManager
اندازه بافر: اندازه بافر حلقه درون حافظه را برای ردیابی WindowManager تنظیم می کند. یک بافر بزرگتر امکان جمع آوری داده های بیشتری را فراهم می کند اما استفاده از حافظه را افزایش می دهد.
نوع ردیابی: گزینه های فرکانس را برای جمع آوری حالات تعریف می کند:
فریم: در این حالت، WindowManager یک حالت را در هر فریم تخلیه میکند و اطمینان حاصل میکند که فقط حالتهای WindowManager معتبر ضبط میشوند. این حالت کمترین سربار عملکرد را دارد.
تراکنش: این حالت هر زمان که تراکنش انجام شود، وضعیت WindowManager را ثبت می کند. شما می توانید چندین تراکنش را در یک فریم انجام دهید، بنابراین این امکان را برای اشکال زدایی حالت های WindowManager میانی در طول یک فریم فراهم می کند. با این حال، این حالت در مقایسه با حالت فریم، سربار عملکرد بالاتری دارد.
سطح ردیابی: پرحرفی ردیابی های WindowManager را تعیین می کند:
verbose: شامل تمام پنجره ها و اطلاعات پیکربندی برای هر پنجره است. این حالت بالاترین سربار حافظه و عملکرد را دارد.
اشکال زدایی: شامل اطلاعات مربوط به همه ویندوزها می شود، اما فقط پیکربندی پنجره را در صورتی ثبت می کند که دارای تنظیمات لغو درخواستی باشد.
بحرانی: شامل اطلاعات مشابه حالت Debug است، اما فقط شامل پنجره های قابل مشاهده است. این حالت دارای کمترین سربار حافظه و عملکرد است.
تخلیه می کند
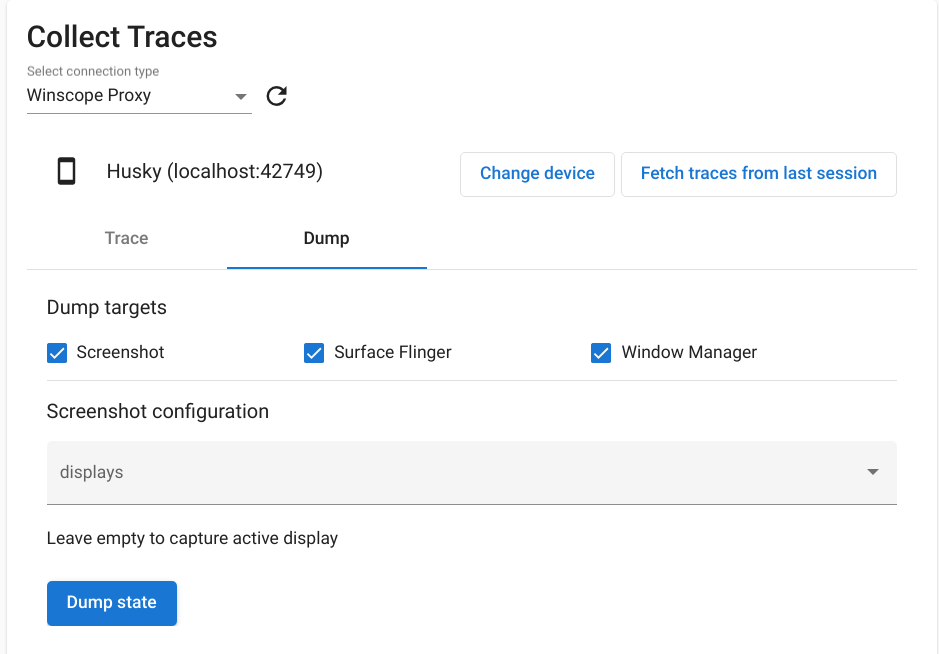
برای گرفتن حالت dump با استفاده از Winscope، در قسمت Collect Traces در صفحه اصلی، زبانه Dump را انتخاب کنید و سپس روی Dump state کلیک کنید:
شکل 8. حالت تخلیه در Winscope.
پیکربندی اسکرین شات
Winscope امکان گرفتن اسکرین شات برای چندین نمایشگر را فراهم می کند. یک نمایشگر را از منو برای گرفتن اسکرین شات انتخاب کنید. اگر انتخابی انجام نشود، یک اسکرین شات برای نمایش فعال جمع آوری می شود.
محتوا و نمونه کدها در این صفحه مشمول پروانههای توصیفشده در پروانه محتوا هستند. جاوا و OpenJDK علامتهای تجاری یا علامتهای تجاری ثبتشده Oracle و/یا وابستههای آن هستند.
تاریخ آخرین بهروزرسانی 2025-07-29 بهوقت ساعت هماهنگ جهانی.
[[["درک آسان","easyToUnderstand","thumb-up"],["مشکلم را برطرف کرد","solvedMyProblem","thumb-up"],["غیره","otherUp","thumb-up"]],[["اطلاعاتی که نیاز دارم وجود ندارد","missingTheInformationINeed","thumb-down"],["بیشازحد پیچیده/ مراحل بسیار زیاد","tooComplicatedTooManySteps","thumb-down"],["قدیمی","outOfDate","thumb-down"],["مشکل ترجمه","translationIssue","thumb-down"],["مشکل کد / نمونهها","samplesCodeIssue","thumb-down"],["غیره","otherDown","thumb-down"]],["تاریخ آخرین بهروزرسانی 2025-07-29 بهوقت ساعت هماهنگ جهانی."],[],[],null,["# Capture traces with Winscope\n\n[Run Winscope](/docs/core/graphics/winscope/run) locally or access it\nfrom a web server.\n\nYou can capture traces using Winscope for local development and debugging.\nWinscope uses [adb](https://developer.android.com/tools/adb), which supports\ndevice connection over USB or Wi-Fi.\n\nThe **Collect Traces** screen is displayed on launching Winscope.\n\nDevice connection\n-----------------\n\nYou can connect devices in Winscope using\n[Winscope Proxy](#winscope-proxy-setup)\nor\n[Web Device Proxy](#web-device-proxy-setup).\nBy default, the Winscope homepage shows the **Winscope Proxy** connection setup\nUI.\n\nTo start capturing traces, choose one of the following device connection\nmechanisms.\n\n### Winscope Proxy setup\n\nFollow these steps to set up Winscope Proxy:\n\n1. Under **Collect Traces** on the homepage, choose **Winscope Proxy** in the\n **Select connection type** drop-down:\n\n **Figure 1.** Capture traces using Winscope Proxy.\n2. Launch the Winscope ADB Connect proxy to capture traces directly from your\n browser, by running the following command:\n\n python3 $ANDROID_BUILD_TOP/development/tools/winscope/src/adb/winscope_proxy.py\n\n | **Note:** Python 3.10+ and adb are required.\n3. Note the Winscope proxy token displayed on the terminal after execution.\n\n4. After you launch the Winscope ADB Connect proxy, the screen changes as\n follows. To establish the initial connection to the proxy, input the\n Winscope proxy token from step 3 and click **Connect**.\n\n **Figure 2.** Connect to Winscope Proxy.\n\n### Web Device Proxy setup\n\nFollow these steps to set up Web Device Proxy:\n\n1. Under **Collect Traces** on the homepage, choose **Web Device Proxy** in the\n **Select connection type** drop-down:\n\n **Figure 3.** Capture traces using Web Device Proxy.\n2. If you don't have the Web Device Proxy daemon on your machine, click\n **Install** or run the\n [installer](https://tools.google.com/dlpage/android_web_device_proxy).\n\n | **Note:** Web Device Proxy is not yet supported on Mac.\n3. Approve origin access to Web Device Proxy through the dialog.\n\n **Figure 4.** Authorize origin.\n4. Approve access for each new device the first time you connect to the device.\n If the dialog does not automatically appear, click the `lock_open` icon next\n to the device:\n\n **Figure 5.** Authorize device.\n\nTraces\n------\n\nFollow these steps to collect traces:\n\n1. When connected, to initiate the capture process, select the targets and\n configure the settings. Then click **Start trace** to begin the capture:\n\n **Figure 6.** Collect traces in Winscope.\n2. To stop the capture, click **End trace**:\n\n **Figure 7.** End trace in Winscope.\n\nTrace options\n-------------\n\nThis section describes the options for each trace type.\n\n### Screen recording\n\nWith Winscope, you can record the screen of multiple displays. Choose a display\nfrom the menu to screen record. If you don't make a selection, Winscope records\nthe active display by default.\n| **Note:** Multi-display selection is available only with adb `screenrecord` v1.4 and higher, that is builds from September 2024 on. Single display selection is available for any version earlier than that.\n\n### SurfaceFlinger\n\n- **Buffer size:** Adjusts the size of the in-memory ring buffer for the\n SurfaceFlinger trace. A larger buffer enables the collection of more data\n but increases memory usage.\n\n | **Note:** Buffer size is deprecated starting in Android 15.\n- **Input:** If the surface contains input data, tracks the specifics of\n the input window.\n\n- **Composition:** Traces the composition type and visible region.\n\n- **Metadata:** Traces additional surface metadata, including offscreen\n layers.\n\n | **Warning:** Metadata is highly verbose and requires a large amount of memory.\n- **HWC:** Traces additional unstructured hardware composer metadata.\n\n | **Warning:** HWC is highly verbose and requires a large amount of memory.\n- **Trace buffers:** Configures SurfaceFlinger to trace all buffer changes on\n the surface. By default, SurfaceFlinger traces a new state only when the\n geometry is altered.\n\n- **Virtual displays:** Includes virtual display layers in the trace.\n\n### WindowManager\n\n- **Buffer size:** Adjusts the size of the in-memory ring buffer for the WindowManager trace. A larger buffer enables the collection of more data but increases memory usage.\n- **Tracing type:** Defines the frequency options for collecting states:\n\n - *frame:* In this mode, the WindowManager dumps a single state per frame, ensuring that only valid WindowManager states are captured. This mode has the lowest performance overhead.\n - *transaction:* This mode records a WindowManager state whenever a transaction is committed. You can commit multiple transactions within a frame, so this allows for debugging intermediate WindowManager states during a frame. However, this mode has a higher performance overhead compared to the frame mode.\n- **Tracing level:** Determines the verbosity of the WindowManager traces:\n\n - *verbose:* Includes all windows and configuration information for each window. This mode has the highest memory and performance overhead.\n - *debug:* Includes information about all windows, but logs only the window configuration if it contains a requested override configuration.\n - *critical:* Includes the same information as Debug mode, but includes only visible windows. This mode has the smallest memory and performance overhead.\n\nDumps\n-----\n\nTo take a state dump using Winscope, under **Collect Traces** on the homepage\nselect the **Dump** tab and then click **Dump state**:\n\n**Figure 8.** Dump state in Winscope.\n\n### Screenshot configuration\n\nWinscope allows taking a screenshot for multiple displays. Choose a display from\nthe menu to screenshot. If no selection is made, a screenshot is collected for\nthe active display."]]